Installing accessories
Preparation
Check the serial number on the cap nut of the tool. There are two alternatives:
a) The serial number starts with generation letter A or B.
b) The serial number starts with generation letter C.

Required tools:
Adjustable spanner
Screwdriver
Put the front part in a clamping jaw of a suitable size and fasten the clamping jaw in a vise.
Loosen the front cap nut using an adjustable spanner. Remove the tool from the vise.
Pull out the angle gear carefully from the tool.
Remove the following parts from the angle gear housing:
The lock ring (keep for later use).
The sealing washer (to be discarded).
The front cap nut (to be discarded).
Mount the following parts on the angle gear housing:
New suitable front cap nut. Apply a thin layer of grease on the inside of the cap nut.
New sealing washer.
Lock ring.
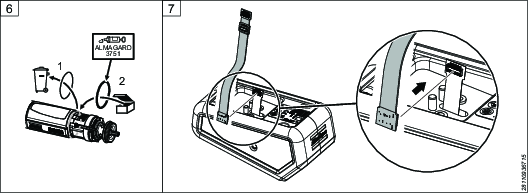
Replace the O-ring on the motor housing with an O-ring with the same diameter but thicker. Apply a thin layer of grease on the O-ring and on the lower section of the motor housing.
Connect the correct adapter cable to the ILP Primary Flex cable on the ILP module.

For tools with generation letter A/B, use the adapter cable ILP-ILM ITBA-A/B Flex Adapter. For tools with generation letter C, use the adapter cable ILP-ILM ITBA-C Flex Adapter.

Make sure to connect the correct end of the adapter cable, the one with one connector, to the cable on the ILP module. It should be connected in the correct orientation, as can be seen in step 6 of the instructional diagram below.
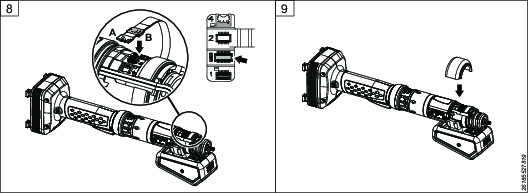
Connect the other end of the adapter cable to the USB port on the tool.

Make sure to connect the correct cable connector (B) to the USB port.
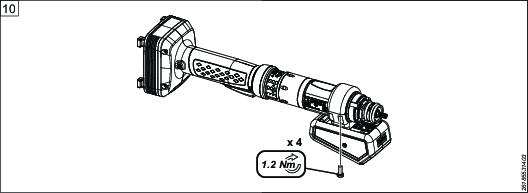
Place the upper ring on the tool.
Tighten the lower ring and the upper ring (the half-rings) with 4 screws using a screwdriver.

Make sure the sealing on the end of the half-rings seals tightly.
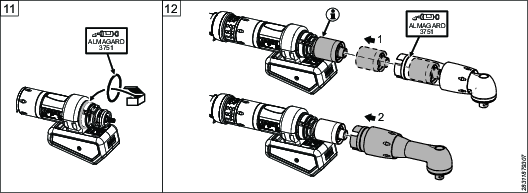
Place an O-ring in the slot at the front of the half-rings. Apply a thin layer of grease on the O-ring.
Pull out the planetary gear from the gear housing. Push down the planetary gear fully on the shaft.

Make sure the gear wheel is placed in correct position.
Put the gear back in position. Apply a thin layer of grease on the sealing washer.
Put the front part in the clamping jaw and fasten the clamping jaw in the vise.
Tighten the front cap nut using adjustable spanners.


