Adding a Joint inspection
In the Joints page, select a Joint already configured.
On the upper part of the Edit joint page, tap Inspections.
On the upper-right corner of the Inspections page, tap Add.
In the Test type window, select an inspection. In the following an example of the Add Cp/Cpk inspection page. The structure is the same for all the inspections.
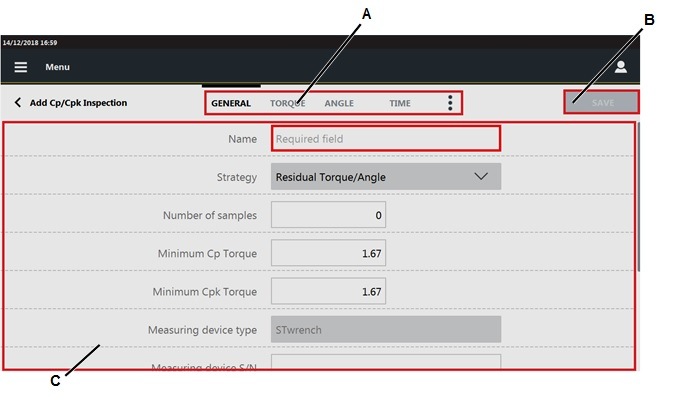
A
Categories
B
Save button
C
Parameters
In the General category, configure the general parameters of the inspection.
In the upper part of the Add inspection, tap Torque.
In Torque category, configure the torque parameters of the inspection
In the upper part of the Add inspection, tap Angle.
In Angle category, configure the angle parameters of the inspection.
In the upper part of the Add inspection, tap Time.
In Time category, configure the time parameters of the inspection.
On the upper part of the Add inspection, tap the More options icon (
 ). Then tap Picture. In this page the picture sent by external software is shown.
In the Picture category, it is possible to:
Add an image/video: on a USB storage device, save the image/video to use in a folder named media_items, connect the storage device to the STpad and tap the Add button on the right side of the Picture page. In the Add picture dialog box, select the image/video to load and click OK.
The maximum size of images is 5 MB, the maximum size of videos is 10 MB.
Remove a picture: on the right side of the Picture page, tap the Remove button.
On the upper part of the Add inspection, tap the More options icon (
). Then tap Traceability.In the Traceability category of the Add inspection page, configure the following parameters:
Verification code: type the verification code that must be entered or scanned when the inspection is run. This field is case-sensitive.
Verification code description: to guide the operator, type the description of the verification code dialog box that is displayed when the inspection is run.
Assignable causes: it is possible to:
List:
select an assignable causes list: tap the Search icon (
 ) and then select an already configured item in the Assignable causes list page.
add a new assignable causes list: tap the Search icon (
); on the upper-right corner of the Assignable causes list page, tap Add to configure a new item.delete the link to the assignable causes list: tap the Delete icon (
 ).
).
Mandatory: if the check box is selected, the operator must select/type an assignable cause to continue the test.
Force selection from list: select between:
No: the operator can type the assignable cause, without selecting it from the list.
Yes: the operator can only select the assignable cause from the list.
Inherit: the selection from list can be forced or not forced, depending on the definition of this parameter in the Assignable causes list page.
Corrective actions: it is possible to:
List:
select a corrective actions list: tap the Search icon (
) and then select an already configured item in the Corrective actions list page.add a new corrective actions list: tap the Search icon (
); on the upper-right corner of the Corrective actions list page, tap Add to configure a new item.delete the link to the corrective actions list: tap the Delete icon (
).
Mandatory: if the check box is selected, the operator must select/type a corrective action to continue the test.
Force selection from list: select between:
No: the operator can type the corrective action, without selecting it from the list.
Yes: the operator can only select the corrective action from the list.
Inherit: the selection from list can be forced or not forced, depending on the definition of this parameter in the Corrective actions list page.
In the upper-right corner of the Add inspection, tap Save.


