Tools
On the left-side menu bar, click Main Data > Tools.
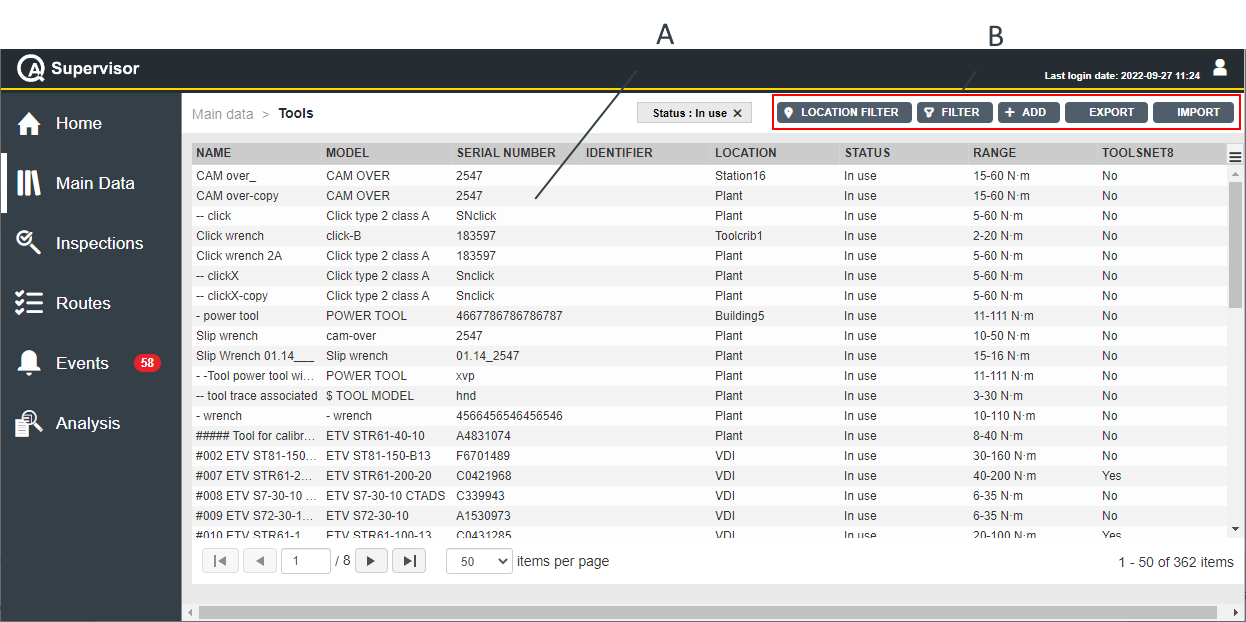
A | Tools workspace | B | Command buttons |
The Tools workspace is divided into the following columns:
Name: name of the tool.
Model: model of the tool.
Serial number: serial number of the tool.
Identifier: custom identification code linked to the current tool.
Location: area of the plant where using the tool.
Status: below are the available options, depending on the status of the tool:
In use: in working condition and currently used in production applications
Backup: the tool is not currently used but it is ready to replace an operating tool on the assembly line.
Toolcrib: the tool is stored in the toolcrib. It is waiting for the assignment to a production location depending on the incoming production needs. Do a tool check before a regular usage on the assembly line.
Service/Repair: the tool cannot be used on the assembly line before maintenance is complete. The capability of the tool is verified according to customer’s procedures.
Scrapped/Disabled: the tool is out of order. Do not use it on the assembly line.
Range: torque range of the tool.
Toolsnet8: yes if the tool exists in ToolsNet 8, no otherwise.
In the Tools workspace, click a tool to display the related Tool Details card.
On the upper-right corner of the Tool Details card, click the Close button to exit the Tool Details card (without saving any change).
On the upper-right corner of the Tool Details card, click Inspections Definitions to view the inspection(s) linked to the selected tool. In the Inspections Definitions workspace, click an inspection to open the related Inspection Definition Details card.
On the upper-right corner of the Tool Details card, click Swap to perform a tool swap operation and replace the selected tool. For further information, refer to Performing a tool swap operation.
The Swap button is not available for tools without a Tool model assigned, or with the Tool model set to Generic. For further information, refer to Tool parameters.
At the end of the Tool Details card, the following items record all of the changes made for the selected tool:
History: the history table records all of the changes made for the selected tool.
The first line of the history table summarizes the latest version of the tool configuration.
Click a previous line: the related Tool Details card opens on the left of the Tool Details card related to the latest version.
The differences between the two Tool Details cards are yellow highlighted.
On the upper-right corner of the oldest Tool Details card, click Restore: the previous version of the tool configuration becomes the latest one.
Version: version of the tool configuration.
In the Edit Tool dialog box, change one of the following items to make a new version: Serial number, Identifier, Location, and Status.
Changed by: name of the operator who has made a change to the tool configuration.
On the upper-right corner of the Tools workspace, there are the following command buttons:
Import: click to tools into the Tools workspace.
The Tools configured with a custom status are not imported.
Export: click to export the tool configured in the application.
Add: click to add a new tool into the Tool workspace.
Filter: click to give filters and list only the necessary tool(s).
Location Filter: click to filter the tool(s) depending on its location in the factory structure.
The Import and Export button are available only if the roles for importing and exporting data are enabled. Refer to the Roles paragraph for more information.


