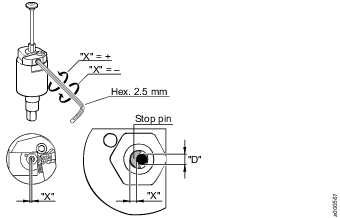
Position of stop pin
The “X” measurement is correctly set at our factory before delivery. Normaly the “X” measurement has to be adjusted only after that the parts concerned have been dismantled. If the accuracy is not as good as expected, check the position of the stop pin. The position of the stop pin is adjusted by turning the screw (see fig. below).
To ensure that the adjustment screw not will change position during operation, must the screw be sealed with "Loctite 290". Apply the "Loctite" before the adjustment is started.
The measurement “X” is hard to measure. It is possible to get the position by starting from “X” = zero. Hold the pulse unit vertically and check that the stop pin is covering a part of the centre hole (i.e. “X” is more than zero). Arrange the shut off valve in the centre hole (see fig. below). Adjust the screw until the valve drops down in the hole of the stop pin. In this position “X” is zero.
Place a gauge (i.e. a drill bit) with a diameter “D” according to table below in the hole. Then unscrew the screw untill the gauge is just tight in the hole. Note: the gauge must not be squeezed by the stop pin. Another way to get an appropriate “X” measurement is to unscrew the screw from the position “X” = zero. Unscrew the No. of turns given in the table below. The measurements given in the table will give a basic adjustment. Check the diameter “D” with a drill bit or similar. An increased “X” means a higher tightening torque and a decreased “X” means a lower tightening torque. It is possible to fine-adjust the tightening torque by turning the screw. Change with an 1/8 of a turn at a time.

“D” | “X” | No.of turns to unscrew to get “X” |
|---|---|---|
1.65 mm | 1.40 mm | 1.75 |


