Loosening
Where applicable, never exceed the maximum torque / pressure indicated on the Slim Link.
If the fasteners are heavily corroded or have been subject to high temperature in service, the break loose torque can be more than double that of the tightening torque. Use a larger tool for loosening than for tightening. To make loosening easier, remove all surface rust with a wire brush and apply releasing oil to the nut, bolt, and bearing surface. Allow sufficient time for the oil to soak in and penetrate before trying to loosen the fastener.
When loosening fasteners, there can be a sudden release of energy when the fastener breaks free. This can cause an unexpected shock force on the tool.
The TLS is designed for restricted access applications with reduced link width and radial thickness compared to the standard TFX Links. Shock loading during the initial nut breakout can damage the drive components, therefore the pump pressure must not exceed 483 bar (7000 psi) or the maximum pressure marked on the link, whichever is lower.
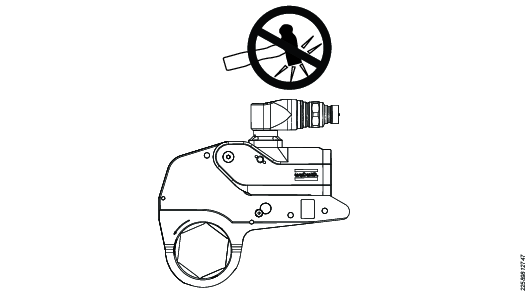
Never strike a wrench with a hammer to assist loosening operations.
Set the pump pressure to the maximum torque/pressure marked on the link or 483 bar (7,000 psi), whichever is lower.
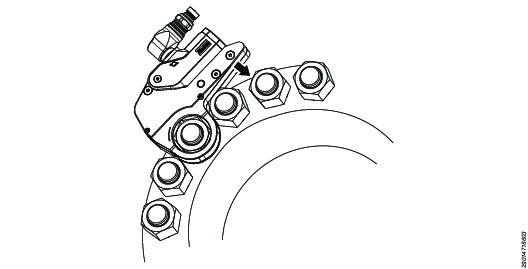
Put the tool on the fastener to be loosened. Push the tool towards the reaction surface until the reaction arm contacts with a suitable reaction point.

The reaction structure must be rigid enough to withstand the reaction force from the hydraulic tool.
Avoid tapered surfaces as the reaction arm could slide, causing adverse loading and tool instability.
Do not use loose spacers to create a reaction structure. If the standard reaction arm is not suitable, contact Atlas Copco for advice.
Press and release the Advance button [1] to start the pump.
Support the tool with the support handle and make sure of the following:
The ratchet link is fully engaged with the fastener being loosened.
The reaction arm is firmly against the reaction structure.
The hose and couplings are clear of surrounding structures and are free to move.
Be aware that when the tool is retracting, you must support the weight of the tool; especially on inverted applications. If the tool is not supported, it can fall from the application.
Press and hold the Advance button [1] so that the drive rotates.
The pressure will build until the break loose torque is achieved; then the pressure will drop as the drive rotates and the fastener loosens.
When the piston reaches the end of the stroke the following happens:
The ratchet link stops turning.
The pressure builds up to the set target value.
This does not mean that the bolt is fully loosened, it only indicates that the tool is at full stroke.
When the tool reaches full stroke, support the tool and release the Advance button [1] on the remote control pendant. The tool automatically retracts. Allow sufficient time for the tool to fully retract.
The tool is now ready to advance again. Repeat steps 4–6 until the fastener is fully loosened.
Press the Stop button [0] on the remote control pendant to stop the pump.