ETP TBP / ETP TBP-S Software
Software
Introduction
In this section, you can find the basic information about the product and also the formatting conventions used in the topics.
Liabilities and Warnings
Radio Equipment Directive (EU) 2014/53 (RED) and Commission Delegated Regulation (EU 2022/30) supplementing RED
Radio equipment that communicates via internet and is placed on the EU and the EEA market on or after 1 August 2025 must comply with cybersecurity requirements in RED.
Software versions with earlier release number than 2.2.0 does not comply with the cybersecurity requirements in RED.
It is prohibited to install non-compliant software in products placed on the market on or after 1 August 2025 for the usage in the EU and EEA.
Check serial number to identify the correct date for when the product is placed on the market.
Downgrading to using a software version with an earlier release number than 2.2.0 cancels regulatory compliance within the EU and the EEA and exposes the product to cybersecurity risks.
Use of a software version with an earlier release number than 2.2.0 is on the sole risk and liability of the customer. Atlas Copco assumes no liability whatsoever for any of the potential implications arising from the use of a software version with an earlier release number.
General Data Protection Regulation (GDPR)
This product offers the possibility to process personal identifiable information such as system user name, role and IP-address. The purpose of this processing capability could be to enhance quality control through traceability and proper access management.
If you decide to process personal data you need to be aware of and comply with relevant personal data protection rules, including, in the EU the GDPR as well as other applicable laws, directives and regulations. Atlas Copco can in no way be held liable for any use made by you of the product.
Liability
Many events in the operating environment may affect the tightening process and shall require a validation of results. In compliance with applicable standards and/or regulations, we hereby require you to check the installed torque and rotational direction after any event that can influence the tightening result. Examples of such events include but are not limited to:
initial installation of the tooling system
change of part batch, bolt, screw batch, tool, software, configuration or environment
change of air- or electrical connections
change in line ergonomics, process, quality procedures or practices
changing of operator
any other change that influences the result of the tightening process
The check should:
Ensure that the joint conditions have not changed due to events of influence.
Be done after initial installation, maintenance or repair of the equipment.
Occur at least once per shift or at another suitable frequency.
Warnings
Conventions
To enhance user understanding, certain formatting conventions are used throughout this document. The formatting conventions used are listed below.
Element | Notation | Description | Output |
|---|---|---|---|
General emphasis | In the Program workspace. | To make certain text elements stand out, or to highlight. | Text in Bold |
Graphical User Interface (GUI) items | Select the Function button. | Any reference to items found on screen in the GUI (for example, command buttons, icon names and field names). | Text in Bold |
Graphical User Interface (GUI) Path > | Generally, on the top of the GUI. | Navigation aid which keeps track of the location in the GUI. | For example: Controller > Program > Edit |
User input | Enter a Description for the program. | Any text input by the user. | Text in Bold |
File names | Enter a File Name for the export. | Files either exported from, or imported into the system. | Text in Bold Italic |
Variable and parameter names | Enter a Name for the export. | Variable and parameter names (not values). | Text in Italic |
Variable and parameter values | Enter a VALUE for the export. | Variable and parameter values. | Text in BOLD CAPS |
System output | Client.Domain.Models.ExportImportConfiguration | Any text output by the system. | Text in Monospace |
External links | Links to external sites that have information connected to the document or subject content. These could include:
| Selectable text to external sites | |
Internal documentation links |
If available, these links will be presented below the text. | Selectable text to internal content |
Revision History
Software Version | Software | Changes |
|---|---|---|
2.X.X | This ETP TBP/ETP TBP-S software user guide is only suitable for users using software version greater than 2.0.0. The RED compliant Tool Software will be from 2.2.0 for TBP and TBP-S. | Possibility to use the tool in Standalone mode added. |
System Overview
The tool can be used in two different modes:
Standalone mode
Connected mode
Standalone Mode
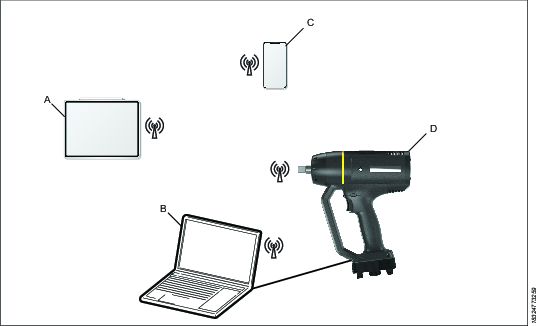
In Standalone mode the tool is not connected to a controller. It is configured and controlled through a web interface that can be accessed on any kind of browsing device. The web interface is connected to the tool via radio connection.
Any browsing device used together with this tool, must be approved for the industrial environment for the market in which the tool and browsing device are being used.

a A service computer is required for servicing and updating. It has to be connected to the tool using a USB cable. A user computer can be used like any browsing device to access the web interface wirelessly. | ||
A | Tablet (optional) | |
B | Service computer/user computer (optional)a | |
C | Mobile phone (optional) | |
D | ETP TBP/ETP TBP-S tool | |
Connected Mode
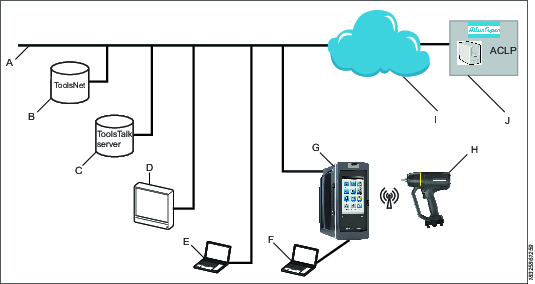
The web interface can be used to set the tool in Connected mode. In Connected mode the tool is connected to a controller. It is configured and controlled through the controller. The tool can be connected to a controller via WLAN or Bluetooth.

A | Factory network. |
B | ToolsNet server: for storing tightening results and for statistical analysis. |
C | ToolsTalk 2 server: for configuration and parameter settings for controllers and TBP tools. |
D | Industrial PC (IPC): can be used as client terminal to the ToolsTalk 2 and ToolsNet servers. |
E | Portable computer connected to the factory network: can be used as client terminal to the ToolsTalk 2 and ToolsNet servers. |
F | Service computer: can be connected to the service port of a controller or an TBP tool. |
G | Power Focus controller: used with handheld tools. |
H | ETP TBP/ETP TBP-S tool |
I | The internet cloud. |
J | Atlas Copco Licensing Portal (ACLP): located at Atlas Copco and provides support to licensed functionality in the Functional Management System (FMS). |
This User Guide focuses on the web interface. For information about using the tool in Connected mode, refer to ToolsTalk Service 2 User Edition User Guide and Power Focus Configuration Guide.
The User Interface
Home Page
The home page of the web interface shows the results from the latest performed tightening. The latest tightening program that was used is active and no changes can be made before logging in.
It is possible to log in either as MANAGER or OPERATOR.
The web interface can be used in three different modes
Quality mode
No login required
See the latest tightening results
Operator mode
Operator login required
Select between and run different tightening programs
See tightening results
Manager mode
Manager login required
Create, edit, and delete tightening programs
Select between and run different tightening programs
See tightening results
Change tool settings
Perform tool service
View status and errors
Icons
The following table gives an overview of the icons available on the Manager main menu.
Icon | Description |
|---|---|
| Run Tightening Programs The Run Tightening Programs menu shows a list of existing tightening programs stored in the tool. |
| Tool Results Displays the latest tightening results, events, and NOK ratio. |
| Setup Tightening Programs The Setup Tightening Programs menu shows a list of existing tightening programs stored in the tool. Selecting an individual program opens the different menus to configure and set parameters for the selected tightening program. |
| Tool Settings This menu is used to change between different types of tool connection and to edit settings for the connections. |
| Tool Service This menu is used to perform motor tuning of the tool. |
 | Status and Errors The Status and Errors menu shows status and errors for the tool. |
| Logout/Exit |
Installation and Upgrade
In this section, you can find information to help with the initial installation of the product, or upgrading from one version to another.
Web Browser and Device Requirements
Any web browser is recommended.
JavaScript needs to be allowed on the device.
Any browsing device used together with this tool, must be approved for the industrial environment for the market in which the tool and browsing device are being used.
Compatibility Matrix
ETP TBP/ETP TBP-S Software | Power Focus 6000 Software |
|---|---|
TBP 2.X.X | From 2.8 |
TBP-S 2.X.X | From 3.X |
Updating the Tool Software
When the tool software is updated, the web interface will also be updated.
For information on updating the tool software, see ToolsTalk Service 2 User Edition User Guide.
To prevent damage to the tool:
Make sure the battery is fully charged when performing a software update.
Do not remove the battery from the tool while the software update is in progress.
Do not remove the memory card from the tool while the software update is in progress.
Configuration
In this section, you can find detailed information about how to create, modify, and verify product settings.
Configuration Options
The configuration and setting up of the tool can be done in the following ways:
Connected mode: The tool is configured in the Power Focus controller.
Standalone mode: The tool is configured in the web interface.
Setting the Tool in Standalone Mode
The tool is in Standalone mode when delivered. If the tool has been used in another mode after that, perform this procedure to set it back in Standalone mode.
Connecting the Web Interface to the Tool
Make sure that the battery is not attached to the tool. Press and hold the Function button that is situated above the Tool trigger.
Continue to press the Function button and attach the battery. The tightening direction LED will light up.
When the tightening direction LED shuts off, release the Function button.
When the tightening direction LED lights up again, press and hold the Function button.
When the tightening direction LED shuts off, release the Function button. The tool is now in Standalone Mode and all LEDs are flashing. When all other LEDs stop flashing, the blue LED indicator for radio connection should continue flashing.
Make sure that the blue LED indicator for radio connection on the tool is flashing.
Use any browser device and set the network to the tool network (TBP_serial number). The blue LED indicator for radio connection on the tool is lit up in blue.

The default password is 87654321.
Open the web browser on the browsing device and enter the IP address of the tool (192.168.2.1).

JavaScript has to be allowed on the browser device.
The home page is displayed. Log in as Manager or Operator.

The default password for Manager and Operator is password.
Working with the Tightening - Without login
Users without login can only access the Tightening Results view, which shows the results of the latest performed tightening.
Working with the Tightening - Operator
Operator Login View
The Operator login view shows the results of the latest performed tightening.
Changing Between Tightening Programs
On the Operator login home page, select the arrow on the Program row. A list of tightening programs appears. The arrow in the top left corner leads back to the Operator login view without any changes being made.
Select a tightening program and wait for the Operator login view to appear. The new program is now ready to use.
Working with the Tightening - Manager
Manager Login View
The Manager login view shows the results of the latest performed tightening.
By selecting Menu, the Manager main menu is displayed.
Creating a New Tightening Program
A total number of six tightening programs can be created and stored in the web interface.
On the Manager main menu, select Setup Tightening Programs.
Select create new to create a new program.
Configure the tightening program.
Select TEST and perform a tightening with the tool. Test results are displayed in the Test result section. Inspect the results and check the joint with a calibrated torque wrench. If needed, change the Residual Torque Correlation Factor (RTCF). Repeat step 4 until the required result is obtained.

For more information about working with the Residual Torque Correlation Factor (RTCF), refer to Power Focus Configuration Guide.
Select SAVE to save the tightening program. The new tightening program is now the active program.

To exit edit mode without applying any changes, select CANCEL. Never use the back button on the web browser to exit edit mode.
Editing a Tightening Program
On the Manager main menu, select Setup Tightening Programs.
Select a tightening program from the list.
Configure the tightening program.
Select TEST and perform a tightening with the tool. Test results are displayed in the Test result section. Inspect the results and check the joint with a calibrated torque wrench. If needed, change the Residual Torque Correlation Factor (RTCF). Repeat step 4 until the required result is obtained.

For more information about working with the Residual Torque Correlation Factor (RTCF), refer to Power Focus Configuration Guide.
Select SAVE to save changes.

To exit edit mode without applying any changes, select CANCEL. Never use the back button on the web browser to exit edit mode.
Deleting a Tightening Program
On the Manager main menu, select Setup Tightening Programs.
Select a tightening program from the list
Select DELETE.

To exit edit mode without applying any changes, select CANCEL. Never use the back button on the web browser to exit edit mode.
Changing Between Tightening Programs
On the Manager main menu, select Run Tightening Programs. A list of tightening programs appears.
Select a tightening program and wait for the Manager login view to appear. The new program is now ready to use.
Viewing Tightening Results
On the Manager main menu, select Tool Results.
The results from the latest performed tightening are displayed.
By selecting the arrow on the Program row, it is possible to select a tightening program to run from the appearing list.
By selecting the arrow on the Tool status row, the Status and Errors page is displayed.
Editing Tool Settings
In the Tool Settings menu it is possible to change between different types of tool connections, and to edit settings for the connections.
Changing the Tool Connection Between Web, Bluetooth, and WLAN
The tool can be used in two different modes:
Standalone mode
Connected mode
In Standalone mode the tool is not connected to a controller. It is configured and controlled through a web interface. The tool is connected to the web interface via radio connection. In Connected mode the tool is connected to a controller. It is configured and controlled through the controller. The tool can be connected to a controller via WLAN or Bluetooth.
Web
On the Manager main menu, select Tool Settings.
On the Tool Connection row, select Web from the drop down menu.
If required, make changes to the Standalone settings and select SAVE to save changes.
Perform the Standalone mode pairing sequence with the tool, see Setting the Tool in Standalone Mode in the Configuration chapter in this User Guide.
When the tool has been set to web connection everything except tightening programs are set to default.
Any browsing device used together with this tool, must be approved for the industrial environment for the market in which the tool and browsing device are being used.
Bluetooth
When in Standalone mode, there are two ways to change to Bluetooth connection.
Changing directly to Bluetooth connection without using the web interface. For information about putting a tool into pairing mode, refer to Power Focus Configuration Guide.
Changing to Bluetooth connection via the web interface.
To change to Bluetooth connection via the web interface:
On the Manager main menu, select Tool Settings.
On the Tool Connection row, select Bluetooth from the drop down menu.
For information about putting a tool into pairing mode, refer to Power Focus Configuration Guide.
WLAN
On the Manager main menu, select Tool Settings.
On the Tool Connection row, select WLAN from the drop down menu.
Make required changes to the WLAN settings and select SAVE to save changes.
For more information about network setup, refer to ToolsTalk Service 2 User Guide.
Performing Motor Tuning
A motor tuning adjusts the tool’s motor control unit to optimize the performance and minimize loss.
The motor tuning will take approximately two minutes to perform and will rotate the spindle in both clockwise (CC) and counterclockwise (CCW) directions before it is finished.
On the Manager main menu, select Tool Service.
Select START and then press the trigger on the tool.
Follow the instructions on the screen and keep pressing the tool trigger until the motor tuning is done.
Status: Succeeded - the motor tuning is successful.
Status: Failed - the motor tuning is not successful, or the tool trigger was released before the motor tuning was finished.
Operation
In this section, you can find step-by-step information about how to operate the product.
Working with the Tool
Rapid Backup Unit
Information regarding if the tool is in Connected or Standalone Mode is saved on the Rapid Backup Unit (RBU) SD card of the tool.


