Accionamiento de la bomba
3:6 CONFIGURAR LA PRESIÓN DE FUNCIONAMIENTO EN LA BOMBA
Para ajustar la presión de la bomba, siga este procedimiento:
Loosen the knurled locking ring below the "T" handle on the pump's external pressure regulator. Then turn the "T" handle counter clockwise (CCW) until it turns freely and easily.
Turn the pump "on". Encienda la bomba. Utilizando la botonera del mando a distancia, mantenga pulsado el conmutador de avance (o el botón en las bombas de aire).
While holding the pump in the advance mode, slowly turn the "T" handle clockwise and observe the pump pressure gauge rise.

Always adjust the regulator in order to increase the pressure up - Never down. No ajuste el regulador de presión hidráulica con la herramienta en marcha.
Cuando su indicador alcance 4 000 PSI, deje de girar la empuñadura en T y deje que el indicador se estabilice.
If the pressure continues to rise (above 4,000 psi), release the advance button and back off your pressure slightly-by turning CCW on the "T" handle. Then re-depress the advance switch on you remote and slowly bring pressure up to 4,000 psi again.
When the pressure is correct, turn the pump "off" and tighten the knurled lock nut provided under the "T" handle. This sets pump pressure, which determines torque tool output.
Referencia
Descripción
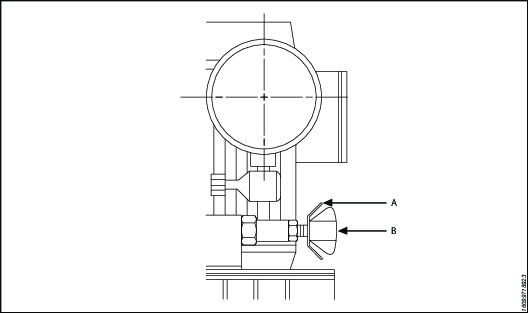
A
Anillo de retención
B
Empuñadura en T
Una vez haya configurado y bloqueado su presión objetivo, realice un ciclo de la bomba una vez más para garantizar que su ajuste de presión no ha cambiado al girar hacia abajo el botón moleteado.
Applying Torque to Wrench
Having set your target pressure, cycle the tool three or four times to full pressure. Cycling the tool ensures that the system is operating properly and removes trapped air, if any.
Verify that any impact sockets used are rated to accept the full torque output of the tool they are to be used with. Ensure the correct size impact socket for the nut A/F has been selected, placed on the square drive and secure with a locking pin and ring.
Coloque la herramienta y la boca sobre la tuerca, asegurándose de que la tuerca se haya acoplado completamente con la tuerca. Asegúrese además de que el retenedor del mango está accionado.
Asegúrese de que el brazo de reacción está firmemente apoyado contra el objeto estático (p.ej. con una tuerca adyacente, brida, carcasa del equipo, etc.). When positioning the wrench, make sure that the hose connections are well clear of any obstructions and that all body parts are safely out of harm's way. A continuación (nunca antes), aplique una presión temporal en el sistema para asegurarse de que la herramienta esté bien colocada. If it doesn't look or act right, stop and re-adjust the reaction arm.
Read Safety Instructions supplied with the torque wrench for further guidance on tool usage.
Al pulsar el botón del control remoto en la posición de avance, la parte trasera de la herramienta quedará empujada hacia atrás hasta que su brazo de reacción entre en contacto con su punto de reacción.
Mantenga pulsado el botón mientras gire la articulación de la boca o el trinquete hasta que oiga claramente un «clic», lo que significará que el cilindro hidráulico dentro de la herramienta está completamente extendido y no girará más el avance.

Si sigue pulsando el botón del control remoto, se producirá una rápida acumulación de presión hasta el punto en que el indicador lee el valor predefinido antes de aplicar la llave.
Nota: La lectura de la presión preestablecida después de que el pistón se extienda NO indica que el par establecido se aplique al perno. It only indicates that the cylinder is fully extended and cannot turn the socket or the ratchet link further until the tool automatically resets itself.
Releasing the remote control button will retract the cylinder. The tool will automatically reset itself and the operator will hear an audible "click" indicating he can again push the remote control button and the socket will turn. Each time the cylinder is extended and retracted, it is called a cycle. Successive cycles are made until the tool "stalls" at the pre-set Torque/psi with an accuracy of +/-3%. Repeatability is +/- 1%.
IMPORTANTE: INTENTE SIEMPRE UN CICLO FINAL PARA GARANTIZAR QUE SE HAYA ALCANZADO EL PUNTO DE «PARADA».
Should the tool "lock-on" after the final cycle, push down on the remote control button once more (to build pressure) and, while maintaining this pressure, pull back on the external disengagement lever (RT) or reaction Pawl (RTX). Releasing the remote control while continuing to hold back on the pawl lever/reaction pawl will allow the tool to be removed easily.
Loosening Procedures
First, set the pump to 9,000 psi (Do not try directly at 10.000 psi). Change the drive and the reaction arm to the loosening mode (Left = Loose), assuring the reaction arm abuts squarely off a solid reaction point. Press and hold the remote control button down. Pressure will decrease as the socket begins to turn. As the cylinder extends fully, you will hear an audible "click". Release the remote control button, and the cylinder automatically retracts, at this time you will again hear the audible "click". 5. Realice el ciclo de la herramienta hasta que el fijador pueda extraerse con la mano.
NOTA: SI EL PERNO NO SE AFLOJA CON EL PROCEDIMIENTO ANTERIOR, ES UNA SEÑAL DE QUE NECESITA UNA HERRAMIENTA MAYOR PARA AFLOJAR EL PERNO.
Setting Torque
All Atlas Copco power packs operate at a pressure range from 500 to 10,000 psi and are fully adjustable. They have been engineered and designed for portability and high flow for increased speed. Before using your Atlas Copco power pack, check the following points.
¿El depósito está lleno de aceite?
¿Dónde está la toma eléctrica más cercana en el lugar de trabajo?
¿Hay disponible suficiente presión de aire (de 60 a 100 PSI) y flujo de aire en el lugar de trabajo? (solo unidades de aire) (Air units only)
¿El indicador está montado y está clasificado para 10 000 PSI/700 bar?
Presión de trabajo
The pump's maximum working pressure is 10,000 psi / 700 bar. Make sure all hydraulic equipment and accessories are rated for 10,000 psi / 700 bar operating pressure. Hydraulic pumps are available with higher pressure outputs, if not using an Atlas Copco power pack verify maximum operating pressure of the unit being used and ensure the system maximum operating pressure (10,000 psi / 700 bar) is not exceeded.
Conexiones hidráulicas
Never disconnect or connect hydraulic hoses or fittings without first unloading the wrench. Unplug the electrical cord of the pump, and open all hydraulic controls several times to assure that the system has been depressurized. If the system includes a gauge, double check the gauge to assure pressure has been released. When making a connection with quick disconnect couplings, make sure the couplings are fully engaged threaded connections such a fittings, gauges etc. must be clean and securely tightened and leak free.
Loose or improperly threaded couplers can be potentially dangerous if pressurized, however, severe over tightening can cause premature thread failure. Las conexiones deben estar bien apretadas y no presentar fugas. No toque, sujete ni entre en contacto de ningún modo con una fuga de presión hidráulica. El aceite de la fuga podría penetrar en la piel y provocar lesiones. Do not subject the hose and potential hazard such as sharp surfaces, extreme heat or heavy impact. Do not allow the hose to kink and twist. Inspect the hose for wear before it is used.
Electrical Power
COMPRUEBE EL SUMINISTRO ELÉCTRICO ADECUADO ANTES DE CONECTAR.
This motor may spark. Do not operate in an explosive atmosphere or in pressure of conductive liquids.
No utilice un cable de alimentación o alargador dañado o con cables expuestos.
All single phase motors come equipped with a three prong grounding type plus to fit the proper grounded type electrical outlet. Do not use a two prong ungrounded extension cord as the pump's motor must be grounded.
Compare la placa de especificaciones del motor con la potencia disponible de la red eléctrica para evitar quemar el motor o provocar una sobrecarga eléctrica peligrosa.
Prior to Use
Check hydraulic oil (Use Atlas Copco maximiser range Grade 46) level to prevent possible pump burnout. Open the filler plug located on the reservoir plate. Look at oil fill level on the oil sight gauge. The oil level should be approximately 2" from the top of the reservoir plate- with motor off. Add oil as necessary. Do not mix different grades of oil. Make sure all desired gauge, valve, hose and quick coupler connections are tight and secure before operating. The use of a pressure gauge is required for normal pump operation. Mounted on the manifold, the gauge permits the operator to monitor the load on the wrench. Class1 certified calibrated gauges are available for most applications.


