Click strategy
Click strategy
This strategy is applicable to a click wrench with breakaway technology with one breakaway point, defined as setting torque tools (type II and class A, C, G, B by standard ISO 6789)
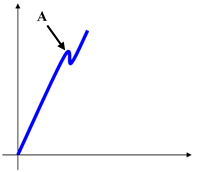
A | Click point |
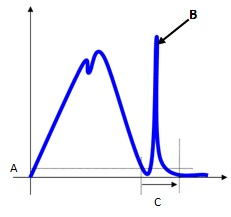
The click-point is detected when the torque drops and then increases again, as shown in the two following examples:
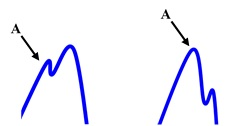
A | Click point |
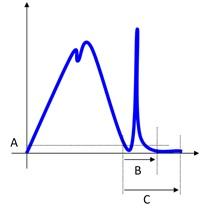
If the torque drops to zero without increasing again after a peak point, the peak point is not detected as click point. For this reason, slip-wrenches cannot be tested with this method (the slip-wrenches should be tested with the Peak Wrench or Cam-over strategies):
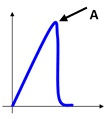
A | Point not detected as click point |
If the test ends and the click-point is not detected, a message Not detected is shown at the bottom-left area of the display. In that case the result is the torque absolute peak.
The parameters that characterize the click point detections are:
Measure delay time: this timeout is used to filter the possible spikes or noise at low torque values. When the torque reaches the Cycle Start value, the timer starts. During this time the torque trace is not analyzed and the click point is not searched.
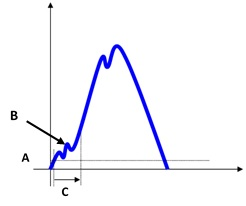
Torque vs time A
Cycle start
B
Ignored point
C
Measure delay time
Reset time: this timeout is used to filter the possible spikes/bounces after the click-point. When the torque goes below the cycle complete value, the timer starts. During this time the torque trace is not analyzed (any click-point possibly occurring during the reset time is not considered). This timeout can be used when the click-wrench produces such spikes-bounces after the click-point.
A
Cycle complete
B
Ignored point
C
Reset time
End cycle time: this timeout defines the end of the test. When the torque goes and remains below the Cycle Complete for the given timeout, the test ends. The test ends when torque remains under the cycle complete load for the timeout (torque during the reset time is ignored).
Torque vs time A
Cycle complete
B
Reset time
C
End cycle time
Slip Torque: The slip torque gives the requested drop in torque after the click-point. If the torque drops more than the slip torque, the peak value is considered as click-point; if not, the peak value is ignored.
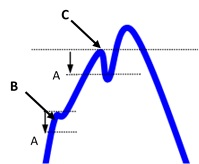
A
Slip torque
B
Torque drops less than the slip torque → the peak is ignored
C
Torque drops more than the slip torque → the peak is a click-point result
However, it is possible to give the slip torque manually. This option is useful in case the click-point is not detected when the slip torque is set to Automatic. In this case do the following procedure: do some tests and make an analysis by looking at the traces. Then, select the proper value in order to detect the click-point.
Suggestions: Setting this value too low increases the risk of detecting a false click-point, while setting this value too high increases the risk of not detecting the real click-point. The best trade-off can be figured out only looking at the characteristics of the specific click-wrench under test.


