Installing backing pad
Before you start the installation
Visually inspect that the backing pad is not cracked or damaged.
Make sure that the backing pad has the appropriate hole dimensions.
Make sure that you have the correct abrasive for the application.
Make sure that the stated maximum speed of the backing pad is greater than or equal to the speed specified on the tool.
Required tools:
Face spanner
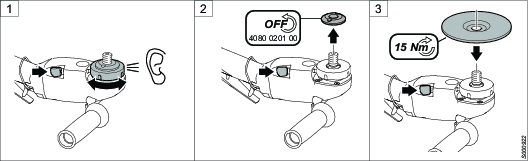
Press the spindle lock button forward and keep it pressed while turning the autobalancer into locked position. Listen for a sound indicating correct position.
Press the spindle lock button forward and keep it pressed while removing the adapter (if attached) using a face spanner.
Fit the backing pad and the abrasive on the spindle.
Attach the flange washer using the face spanner to the recommended torque. Attach the locking kit using the allen key to the recommended torque.
Make sure that the backing pad spins correctly.