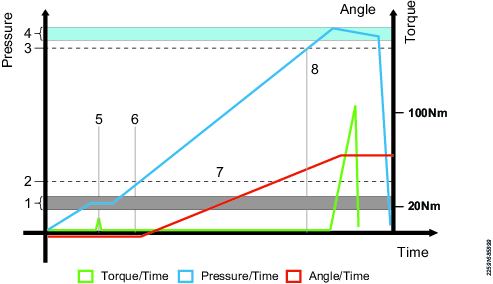
Tensioning Process

1 | Installation check hydraulic pressure |
2 | Angle reset force |
3 | Min bolt tensioning pressure |
4 | Pressure target window. With the pressurize button held, the system will keep the pressure within this window |
5 | Installation check. Sets mechanics in a known position. The nut does not rotate. The play in ratchet and gearbox is fixed in the tightening direction. |
6 | The angle reference point is sampled. Tightening angle measurement starts from this point. |
7 | Pressure builds up, rotation of the nut OK but no need to apply any high torque. Let the hydraulics do the work. |
8 | Min bolt pressure reached. Final fixation of the nut. |
If the installation check pressure ends higher than the pressure that corresponds to angle reset force, the tensioning process cannot set its angle reference point (6).
Therefore, the parameter angle reset force may have to be adjusted, depending on tensioner size, to include some margin for installation check pressure overshoots. The actual installation check pressure depends on, for example, oil type or oil temperature. See the table in section Pressures for Different Tensioner Sizes.


