Handling Results
Latest results tab - Shows the results for the latest tightenings.
Search Results tab - Use the Search button to search for results between specific dates.
Pinned tab - For investigation.
A tightening result can temporarily be stored into the Pinned tab. This is useful for detailed analysis of a tightening, and prevents the tightening result to be dropped from the window as new results are received.
Live results tab - A controller sends tightening results to ToolsTalk 2 as soon as the task is completed, and the result is added to the top of the Live results. A limited number of results can be stored. When the list is full, the oldest result is dropped from the list.
Imported results tab - For viewing imported results.
Pinned - Holding area for investigation
Tightening results can temporarily be stored into the Pinned area. This is useful for detailed analysis of a tightening, and prevents the tightening result to be dropped from the window as new results are received.
Manually: On a result, select the Pin icon.

The tightening result is copied to the Pinned area for investigations. It is possible to pin several results to the temporary storage.
Automated: Select the Auto pin drop-down menu and enter number of results to be pinned. Select Start. The next incoming result will be pinned automatically, continuing until the entered number has been reached, or until pressing Stop.
Remove all results from the pinned area
To remove individual results, unpin it by selecting the Pin icon .
Live results
A controller sends tightening results to ToolsTalk as soon as the task is completed, and the result is added to the top of the Live results. A limited number of results can be stored. When the list is full, the oldest result is dropped from the list.
Each line in the list represents one task and can be a single tightening or a batch sequence, depending on the selected task. Expand the list to view a more detailed information about each tightening.
Use the arrows to expand  the overview result to a more detailed result view or to collapse
  the view to only show the overview result.

Column | Description |
|---|---|
Red bar | The leftmost position in the Live results table may contain a red bar icon , indicating erroneous tightenings for quick identification of errors. This corresponds to NOK. |
Holding pin | Select the holding pin icon to pin the result to the pinned tab. |
Trace | Select the trace icon to view a graphical view of the results in the Trace workspace. |
Save icon | This command creates a .csv file with the trace data. A dialog window is opened as to save the file in a desired location, where it can later be imported from. |
Overall Status | OK or NOK. NOK is always in combination with the red bar icon, to quickly identify erroneous tightenings. Incomplete tightenings will have the word Stopped next to the result. |
Type of task | Shows if the performed task is a single tightening or a batch sequence. |
Virtual station name | Name of the virtual station. |
Scan sequence | If a scanner was used to select the task, the scanned sequence is shown. Otherwise the column is empty. |
Task name | The name of the tightening or the batch sequence. |
Time Stamp | Time stamp for the tightening, that is, time and date. |


Result parameter | Description |
|---|---|
Trace | Select the trace icon to view a graphical view of the results in the Trace workspace. |
Save | This command creates a .csv file with the trace data. A dialog window is opened as to save the file in a desired location, where it can later be imported from. |
Status | This column can show either OK or NOK. NOK is always shown in combination with red text in the ToolsTalk 2 user interface. |
Status info | Additional tightening information. |
Tightening name | The name of the tightening. |
Torque Low Limit | The Low limit which is set in the Step Monitor Peak Torque, that reports Final Torque. |
Final Torque | Final Torque for the tightening. It is the Step Monitor Peak Torque located in the last tightening step that reports this Parameter. |
Target Torque | The Target Torque will show the Target Torque value configured for the tightening strategy, which is used to perform the tightening. |
Torque High Limit | The High limit which is set in the Step Monitor Peak Torque, that reports Final Torque. |
Rundown Angle | If rundown is enabled there will be a Rundown Angle value presented in the result. |
Angle Low Limit | The Low limit which is set in the Step Monitor Angle, that reports Final Angle. |
Final Angle | The actual measured angle of the last tightening step It is the Step Monitor Peak Angle located in the last tightening step that reports this parameter. |
Target Angle | The Target Angle will display the Target Angle value configured for the tightening strategy, which is used to perform the tightening. |
Angle High Limit | The High limit which is set in the Step Monitor Angle, that reports Final Angle. |
TrueAngle Compensation | The TrueAngle compensation will display the compensated angle. |
Start Final Angle | The Start Final Angle will display the torque value from where the Final Angle was initiated. |
Primary error | Primary error of why the result is NOK. |
Failing Step | Indicates the number of the step that detected the first error in case of a NOK tightening. |
Batch | The column is only displayed if the task is a batch sequence. The number indicates the order number of the batch within the batch sequence. |
Batch count | The column is only displayed if the task is a batch sequence. The number indicates the order number of the tightening within the batch. |
Angle and Torque results | Numeric value. Only shown if used as a target value or as a limit value. |
Errors | Shows all errors. |
Elapsed time | Time from tightening start to end. |
Detailed status | For NOK results, additional information about the error is shown. |
Result Reporter
The list shows the values from the result reporters. If there is a result reporter defined for a program monitor/restriction, the value from that monitor/restriction is reported. If there is no result reporter defined for a program monitor/restriction, the value from the latest executed step in main path with a reporter is reported.
Monitors / Restrictions results for multistep
Each step in the multistep tightening program reports data. Most of this data is coming from the monitors and restrictions that are active during the step, so the data is only reported if a monitor or restriction of the correct type is configured.
Step Result Parameter | Description |
|---|---|
Step | The number of the step. |
Status | Status of the step, OK or NOK. |
Step type | Step type in the multistep program. |
Step category | For each step, there is an option to choose a step category. These categories can be customized. By selecting step category, the NOK tightenings will be listed in the event result view with related detailed status together with the corresponding multistep error information. If no selection is made, the detailed status will be set to "uncategorized multistep error". |
Primary error | Primary error of why the result is NOK. |
Elapsed time | Time from tightening start to end. |
Errors | Shows all errors. |
Trace
On a result click on the Trace icon if it is active.  . The result graph is displayed. It is possible to view several traces simultaneously by selecting several traces.
The Trace workspace shows detailed graphical information on one or several tightening result.
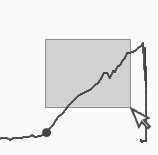
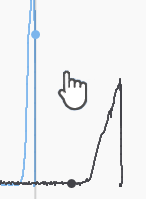
On the workspace, use the mouse wheel to zoom in or zoom out. Or you can select an area to zoom in. Double click the trace area to go back.
Examples:
Select an area to zoom in:
To move the trace, press the wheel button of the mouse:
In the trace graph, delta information based on the selected axis types can be displayed. Right click the two points you want to compare to show the delta between them. Drag the point to modify the target.
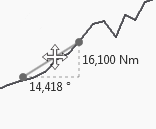
Drag the delta to move it or press Delete to delete it.
Trace settings | Description |
|---|---|
Limits | Possible to select and show Torque limits and Angle limits, if Torque or Angle limits are used in the tightening program. Torque over Angle trace need to be selected to view the limits. Possible to select and show Post view torque limits if Post view torque has been configured in the tightening program. |
Chart | Possible to select Grid lines and Axis labels to show up in the tightening trace view. |
Min/Max | Select to show minimum or maximum measured value. |
|X-Axis| | Select to show the absolute value for X-axis. |
Y1 | Select the information to show in the Y1-axis:
|
Y2 | Select the information to show in the Y2-axis:
|
Y3 | Select the information to show in the Y3-axis:
|
X | Select the information to show X-axis:
|
Traces can be synchronized by X-axis offset with different options. Trace synchronization is available when there are two or more trace results selected.
Sync Options | Description |
|---|---|
None | No offset is set to any trace |
Manual | (Only available when there are two trace results selected) |
Peak | Synchronizes the traces by their absolute peak values. |
Set Value | Synchronizes the traces by a specific value:
|
Measurement Point | Synchronizes the traces by a specific measurement point:
|
Buttons | Description |
|---|---|
Remove all Δ | Remove all the deltas. |
Export... | Exports the trace chart view to the following targets:
|
Remove all | This button clears the trace plot area. |


