Managing the Workspace Windows
The workspace for plant structure and reports both involve the selection of a single controller for further work. The workspace can be minimized or maximized to increase the space for the controller workspace by either, dragging as described and shown in the image below, or by selecting the Plant structure icon  .
.
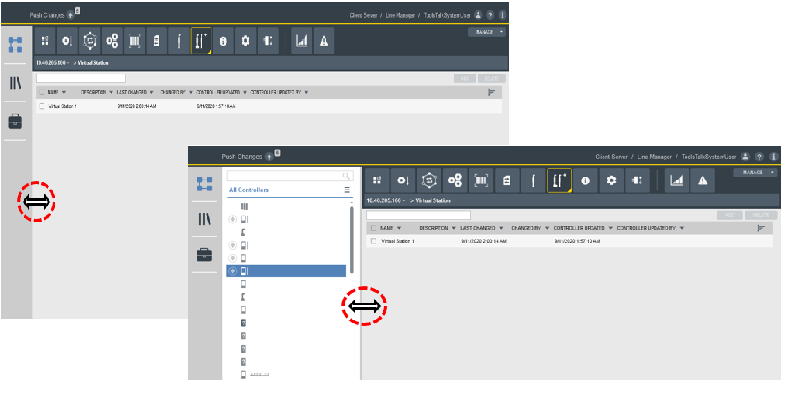
Minimizing and Maximizing the Workspace View
Place the cursor on the line between the two workspace areas. The cursor shape changes from a white arrow to the shape of a horizontal double sided arrow.
Click-hold-drag and the border line between the two workspace area can be moved. The workspace can be maximized by moving the window border all the way to the left-side menu, or maximized by moving the window border to the right-side menu.
Filtering and Sorting the Data Grid
The data grid columns in the workspace windows can be sorted and filtered.
Select a column header to access the sort and filter function.
To sort the list, select Sort list to arrange the list into ascending, descending, or default order.
To filter the list, select the check boxes to filter what is to be displayed. Select Clear filter to return to the default view.
Search Functionality
It is possible to search for a specific content in the tabs in the Plant structure , Libraries
 and the System Administration
  tabs. This functionality is not available for the Scheduled Task and User Groups tabs in the System Administration
tab.
tabs. This functionality is not available for the Scheduled Task and User Groups tabs in the System Administration
tab.
Navigate to the main workspace of the particular tab where the data grid is displayed.
Enter the parameter you would like to search against in the Search bar seen in the top left corner of the workspace.
The list narrows down, based on the parameters selected. For example, if you enter the parameter "Event", only the rows that contain the word "Event" is displayed.
Multi-Sorting Functionality
It is possible to sort the data grid columns in an ascending or descending order (for example, based on index,alphabetical order and time and date and so on) and assign a priority for which column gets sorted first, second and so on.
Navigate to the main workspace of the particular tab where the data grid is displayed.
Select the
 present at the end of the header row of the data grid workspace.
Select the check box by the column name which you would like to first be sorted and then select the direction arrow to indicate if it should be ascending or descending. The arrow pointing up indicates ascending and the arrow pointing down indicates a descending order .
For example, if you select Last Changed first, then the priority number 1 appears next to it and if you had selected the arrow pointing up, then the data in column Last Changed will be displayed with the latest time and date on the topmost row. The other columns will change the display order based on this selection. If another column is selected to be sorted next, then the priority number for that column will be displayed as 2 and the data in the column with priority 2 will be sorted based on the direction arrow after the data in column with priority 1 has been sorted and continues similarly for further columns selected.
To remove or change the priority of the columns, deselect the check boxes and/or make the selection again.


