Changing a HAD Socket on a GFA Module with Shaft lid generation 1
To Remove the Socket:
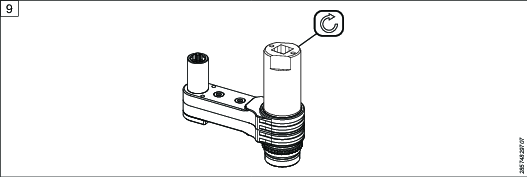
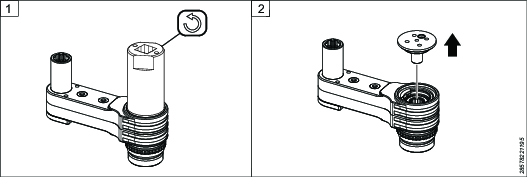
Loosen the shaft lid with a pin spanner.
Remove the shaft lid.
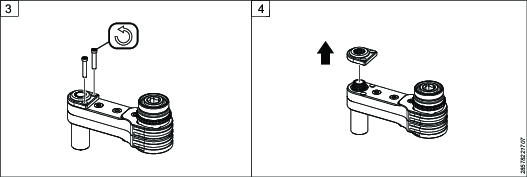
Remove the screws securing the housings and the HAD attachment plate.

The spring in the HAD socket will push the HAD attachment plate upwards. Ensure that the HAD attachment plate does not fly away.
A) If the HAD socket is an upward-facing socket, the screws securing the HAD attachment plate are put on the top.
B) If the HAD socket is a downward-facing socket, the screws securing the HAD attachment plate are put on top and on the bottom of the GFA module.
Remove the HAD attachment plate.
Remove the spring and the bit holder.
Place the GFA module on a rubber mat. Hit the shafts using a mandrel to loosen the upper and lower parts of the housing.
Separate the housings.
Remove the HAD socket.


To Install the Socket:
Add grease to the gear teeth and sliding surfaces of the HAD socket.
Put the new HAD socket in the housing together with the gears.
Use a press tool to press the upper and lower parts of the housing together.
It is important to press evenly over the housing.
Make sure there is no gap between the upper and lower part of the housing.
Insert the bit holder and the spring into the HAD socket.
Put the attachment plate on top of the spring, pressing it down.
Tighten the screws securing the housings and the HAD attachment plate to the specified torque:
A) If the HAD socket is an upward-facing socket, the screws securing the HAD attachment plate are put on the top.
B) If the HAD socket is a downward-facing socket, the screws securing the HAD attachment plate are put on top and on the bottom of the GFA module.
Insert the shaft lid into the housing.
Turn the GFA upside down, put it in a vice and tighten the shaft lid with a pin spanner.