Setting up a Selector 6 via Ethernet Cable/Wireless
Selector 6 main overview
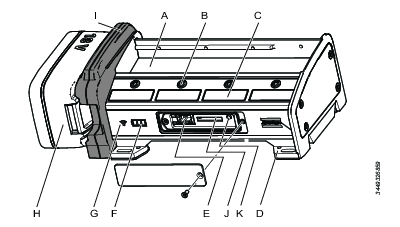
A | Holder for socket or bit |
B | Indicator LEDs for the position |
C | Sticker area |
D | Mounting holes in each corner |
E | Service port |
F | Battery status LED (only available on wireless versions) |
G | WLAN status LED (available on some selectors) |
H | Battery (only available on wireless versions) |
I | Mobility module (only available on wireless versions) |
Selector 6 connection overview
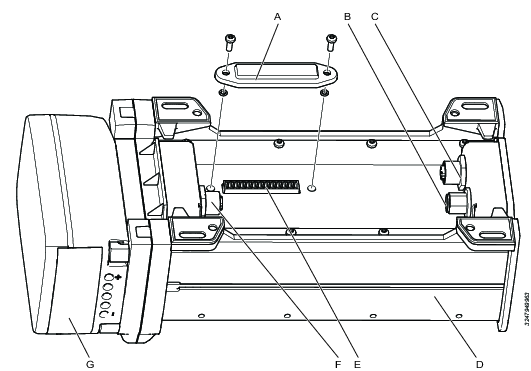
A | Connector cover |
B | External DC power in; Kycon (DC DIN) connector |
C | Ethernet in, upstream connection; M12 D-coded female connector |
D | Selector back side |
E | Digital input and output connector |
F | Ethernet out, downstream connection; M12 D-coded female connector |
G | Battery |
Selector 6 service port overview
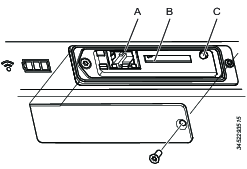
A | RJ45 Service port |
B | RBU slot |
C | Function button |
On the controller, go to Settings > Network and under Factory Ethernet port, check the IP address (only required when setting up via wireless connection).
Open the service port cover on the selector. The cover is secured by a 2 mm allen screw.
Connect an ethernet cable between a PC and the RJ-45 connector in the service interface.
Make sure the selector powered, either by PoE, by external power supply or by battery.
Open a web browser window in the PC.
Type the web address 169.251.1.1 and press the Enter key. The web server in the selector will respond and show the selector web interface.
Select Settings
 in the left navigation (this is selected by default). The Settings workspace shows the configuration menus and is divided into five different settings: Basic settings, Service port, Ethernet in, WLAN, and the POWER FOCUS 6000.
In the Ethernet in section, select External mode On or Off for the desired LED control source.
The next steps in the set-up depend on how the socket selector will be connected to the controller (Ethernet cable directly to the controller (default), Ethernet cable to factory network, or wireless to factory network). See the instructions below for your set-up.

Ethernet ports (RJ45) for connecting devices and daisy-chaining controllers are only available in newer PF6 models. In order to connect Selector 6 via Ethernet cable to older controller models, an adapter cable should be used to connect the Ethernet cable to the controllers COM PORT.
In the Ethernet In section, select PF6000 (default) in the Connected to drop-down.
Click the Save button in top right of the workspace.
Remove the ethernet cable from the service port.
Close the service port with the lid and secure it with the allen screw.
The socket selector shows up in the Connected accessories list (Virtual station > Accessories > Choose accessories > Socket selector)
In the Ethernet In section, select Factory net from the Connected to drop-down
Select DHCP On or Off for dynamic or static IP address configuration. If a static IP address is required, in the IP address field, enter the IP address for the socket selector.
In the PF6000 section, enter the controller IP address (see above) for the controller the selector will be connected to.
Click the Save button in top right of the workspace.
Remove the ethernet cable from the service port.
Close the service port with the lid and secure it with the allen screw.
The socket selector shows up in the Connected accessories list (Virtual station > Accessories > Choose accessories > Socket selector)
In the Ethernet In section, select Factory net from the Connected to drop-down
In the WLAN section, fill out the following parameters:
Enable: set radio button to YES
SSID: fill out the SSID name for the socket selector
Password: fill out the password for the wireless network to be connected to
Encryption type: choose the correct encryption type for the wireless network (WPA-PSK, or WPA2-PSK, EAP-TLS)
In the PF6000 section, enter the controller IP address (see above) for the controller the selector will be connected to.
Click the Save button in top right of the workspace.
Remove the ethernet cable from the service port.
Close the service port with the lid and secure it with the allen screw.
The socket selector shows up in the Connected accessories list (Virtual station > Accessories > Choose accessories > Socket selector)


