Routes page
The Route is a set of tests to run.
There are two different types of routes:
Manual route: it is a set of inspections selected from the inspection list.
Parametric route: it is a set of inspections filtered from the inspection list by location, type, method and expiry date/period. This type of route allows to collect all the inspections with the same parameters.
On the left-side menu bar, click Routes.
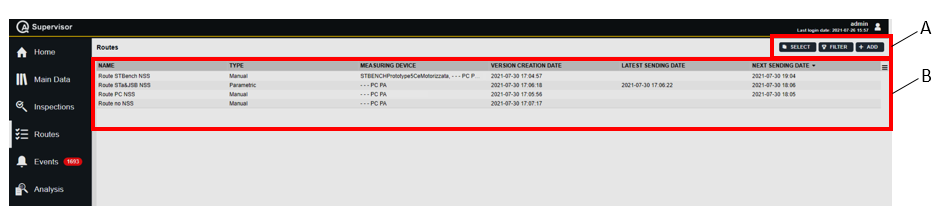
A | Command buttons | B | Routes workspace |
The Routes workspace is divided in the following columns:
Name: name of the route.
Type: type of the route.
Measuring device: name of the measuring device that receives the route.
Version creation date: creation date of the route version.
Latest sending date: date of the last successful sending.
Next sending date: date of the next scheduled sending.
In the Routes workspace, click a measuring device to display the related Route Details card.
On the upper-right corner of the Route Details card, click the Close button to exit the Route Details card.
At the bottom of the Route Details card, the following items record all of the changes made for the selected route:
Version: version of the route configuration.
In the Edit Route dialog box, change one of the following items to make a new version: Name and Inspection.
Changed by: name of the operator who has made a change to the route configuration.
History: the history table records all of the changes made for the selected route.
The first line of the history table summarizes the latest version of the route configuration. Click a previous line: the related Route Details card opens on the left of the Route Details card related to the latest version.
The differences between the two Route Details cards are yellow highlighted.
On the upper-right corner of the oldest Route Details card, do one of the followings:
click Restore: the previous version of the route configuration becomes the latest one.
click Sent route: a new card with the list of the sent route with the selected version is shown.
On the upper-right corner of the Routes workspace, there are the following command buttons:
Select: click on the button to select the routes to synchronize.
Cancel: enabled when the Select button is clicked. It disables the multiple synchronization.
Send: enabled when the Select button is clicked. It starts the synchronization of the selected routes.
Add: click to add a new route into the Routes page.
Filter: click to give filters and list only the necessary route(s).


