ILS Target Quad STB-S/STB-L
Positioning system
Product Information
General Information
Safety Signal Words
The safety signal words Danger, Warning, Caution, and Notice have the following meanings:
DANGER | DANGER indicates a hazardous situation which, if not avoided, will result in death or serious injury. |
WARNING | WARNING indicates a hazardous situation which, if not avoided, could result in death or serious injury. |
CAUTION | CAUTION, used with the safety alert symbol, indicates a hazardous situation which, if not avoided, could result in minor or moderate injury. |
NOTICE | NOTICE is used to address practices not related to personal injury. |
Warranty
Product warranty will expire 12+1 months after dispatch from Atlas Copco's Distribution Center.
Normal wear and tear on parts is not included within the warranty.
Normal wear and tear is that which requires a part change or other adjustment/overhaul during standard tools maintenance typical for that period (expressed in time, operation hours or otherwise).
The product warranty relies on the correct use, maintenance, and repair of the tool and its component parts.
Damage to parts that occurs as a result of inadequate maintenance or performed by parties other than Atlas Copco or their Certified Service Partners during the warranty period is not covered by the warranty.
To avoid damage or destruction of tool parts, service the tool according to the recommended maintenance schedules and follow the correct instructions.
Warranty repairs are only performed in Atlas Copco workshops or by Certified Service Partners.
Atlas Copco offers extended warranty and state of the art preventive maintenance through its ToolCover contracts. For further information contact your local Service representative.
For electrical motors:
Warranty will only apply when the electric motor has not been opened.
Website
Information concerning our Products, Accessories, Spare Parts and Published Matters can be found on the Atlas Copco website.
Please visit: www.atlascopco.com.
ServAid
ServAid is a portal that is continuously updated and contains Technical Information, such as:
Regulatory and Safety Information
Technical Data
Installation, Operation and Service Instructions
Spare Parts Lists
Accessories
Dimensional Drawings
Please visit: https://servaid.atlascopco.com.
For further Technical Information, please contact your local Atlas Copco representative.
Safety Data Sheets MSDS/SDS
The Safety Data Sheets describe the chemical products sold by Atlas Copco.
Please consult the Atlas Copco website for more information www.atlascopco.com/sds.
Country of Origin
For the Country of Origin, please refer to the information on the product label.
Dimensional Drawings
Dimensional Drawings can be found either in the Dimensional Drawings Archive, or on ServAid.
Please visit: http://webbox.atlascopco.com/webbox/dimdrw or https://servaid.atlascopco.com.
Overview
Technical Product Data
Technical Product Data can be found on either ServAid, or the Atlas Copco website.
Please visit: https://servaid.atlascopco.com or www.atlascopco.com.
Service Overview
Service Recommendations
Preventive maintenance is recommended at regular intervals. See the detailed information on preventive maintenance. If the product is not working properly, take it out of service and inspect it.
If no detailed information about preventive maintenance is included, follow these general guidelines:
Clean appropriate parts accurately
Replace any defective or worn parts
Installation
Installation Instructions
Installing the ILS Target
Disassembly of the tool and/or installations of accessories must only be performed by qualified maintenance personnel.
Required tools:
Adjustable spanner
T10 screwdriver
Remove the angle head.
Remove the circlip and the cap nut.
Remove the shaft and the plastic protection.

Screw on the cutting guide.

Cut the insulation. The flex cable is protected under a shield.

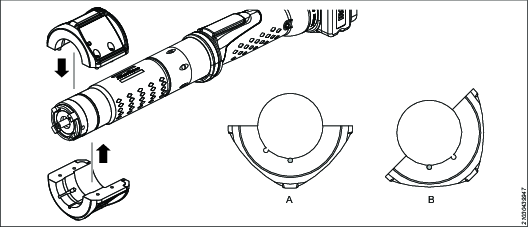
Mount the ILS Target on the tool. Start by fitting the lower half in the correct position.
When the lower half is in the correct position, the pin will fit into the slots of the motor housing, and prevent the ILS Target from rotating.

The pin on the inside of the target can be moved between the slots, allowing for two different positions of the ILS Target on the tool: 45° (A), or flat (B).
Put the upper half together with the lower half.
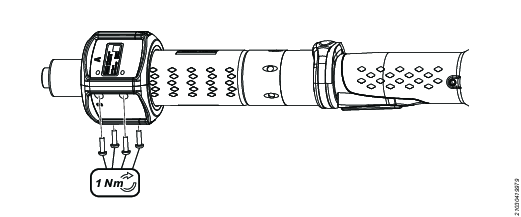
Tighten the four T10 screws.
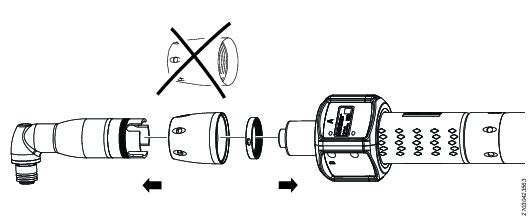
Assemble the new shorter cap nut and the circlip on the angle head. Assemble the shaft and the angle head on the tool. Tighten the cap nut to specified torque.
Inserting the ILS Matrix
Be careful not to scratch the surface of the ILS Matrix. It can affect the performance of the positioning.
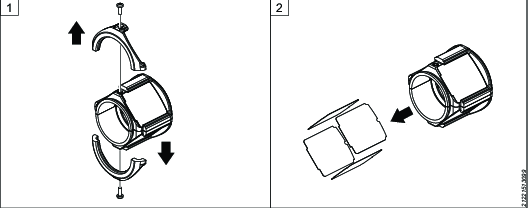
Remove the two T10 screws
Remove the cover tags.
Insert the ILS Matrix into the holder.

Make sure to insert the side with the clipped corners first.
Fasten with two T10 screws.

Operation
Operating Instructions
For information on how to operate the ILS Target together with the ILS Sensor, refer to ILS Sensor Product Instructions and ILG Software User Guide.
Service
Preventing ESD Problems
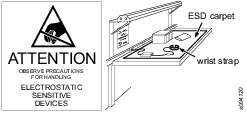
The components inside the product and controller are sensitive to electrostatic discharge. To avoid future malfunction, make sure that service and maintenance is carried out in an ESD approved work environment. The figure below shows an example of an appropriate service work station.
Maintenance Instructions
Service Recommendations
Preventive maintenance is recommended at regular intervals. See the detailed information on preventive maintenance. If the product is not working properly, take it out of service and inspect it.
If no detailed information about preventive maintenance is included, follow these general guidelines:
Clean appropriate parts accurately
Replace any defective or worn parts
Cleaning the ILS Matrix
When necessary, clean the ILS Matrix with a damp, soft cloth. Do not use cleansers containing solvents.
Be careful not to scratch the surface of the ILS Matrix. It can affect the performance of the positioning.
Recycling
Environmental Regulations
When a product has served its purpose it has to be recycled properly. Dismantle the product and recycle the components in accordance with local legislation.
Batteries shall be taken care of by your national battery recovery organization.