Installing the concentric collet
Required tools
-
Vise
-
Open-end spanners
-
Hook wrench
-
Allen key
-
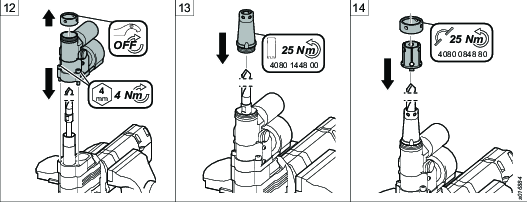
Fasten the drill in a vise with rubber pads, with the spindle guard upward and the drill handle to the right. Remove the spindle guard using an open-end spanner.
-
Remove the depth ring from the spindle using two open-end spanners.
-
Remove the screws that secure the connector.
-
If applicable, remove the connector and the front part.

Do not loose the disc springs.
-
Turn the spindle clockwise to feed out the spindle using an open-end spanner.
-
Replace the old spindle with a spindle for concentric collet. Turn the spindle counterclockwise to feed the spindle using an open-end spanner.
-
Put the drill guide on the spindle. Tighten the drill guide using an open-end spanner.
-
Put the drill bit in the drill guide. Tighten the drill bit using an open-end spanner.
-
Put the guide bushing over the drill guide. Tighten it with screws using an Allen key.
Make sure the disc springs are put in correct position.
-
Install the depth ring onto the spindle and move it into position. Tighten the depth ring using two open-end spanners.
-
Loosen the drill and turn it over. Fasten the drill in the vise.
-
Remove the cap nut from the concentric collet using a hook wrench. Put the concentric collet over the guide bushing. Tighten the concentric collet to the guide bushing using an Allen key.
-
Put the mandrel over the drill bit. Tighten it on the concentric collet using a socket.
-
Put the collet over the mandrel. If the collet is put in correct position, the flanges on the collet will now fit into the slots on the mandrel and prevent it from turning.
Install the cap nut on the concentric collet. Tighten it using a hook wrench.