Setting up the Firewall
The controller can be set up to use a firewall. The firewall is based on the trusted host principle, and only allows incoming connections via ports that are enabled, or addresses that are whitelisted.
By default, the firewall is disabled.
The firewall applies only to incoming connections on the Factory Ethernet Port.
Activating and configuring the firewall
From the home menu select Settings.
Select Network and scroll down to Firewall.
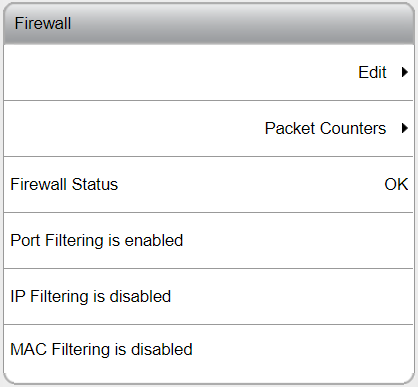
To activate and configure the firewall, select Edit.
Set Off to On to activate the firewall.
Set the remaining features:
Port Filtering (layer 4 firewall)
IP Filtering (layer 3 firewall)
MAC Filtering (layer 2 firewall)
When activating the general firewall feature, Port Filtering (layer 4 firewall) and all its predefined services are enabled by default.
A connection is allowed, when any of the firewall layers accepts it. When no firewall layer is enabled, all incoming connections are allowed through.
Further firewall configuring is done by enabling/disabling connections through the predefined services specified, by adding TCP or UDP ports manually and/or by whitelisting IP/MAC addresses.
Port Filtering (layer 4 firewall)
When Port Filtering (layer 4 firewall) is enabled, the following predefined services are shown with their respective On / Off switches:
Open ports for web (TCP 80, TCP 8080)
Open ports for SSH and SFTP (TCP 22)
Open ports for wireless tools (UDP 6677, TCP 6678)
Open ports for accessories (TCP 25000)
Predefined service | Description |
|---|---|
Open ports for web (TCP 80, TCP 8080) | Ports required for web services so the controller is accessible over the factory network. Setting Open ports for web (TCP 80, TCP 8080) to Off, triggers a warning that the connection with the Web HMI can be lost. |
Open ports for SSH and SFTP (TCP 22) | Port required for SSH and SFTP functionality on the Factory Ethernet Port. |
Open ports for accessories (TCP 25000) | Ports required for accessories to communicate with the controller over the factory network. |
Adding additional TCP and UDP ports
Any additional TCP and UDP ports can be added in their respective entry boxes, that is Open additional TCP ports and Open additional UDP ports. Accepted are both comma-separated ports and port ranges using a dash (-). Example: when entering 1,2,3,4-10, all ports between 1 and 10 are opened.
Invalid port entries trigger an immediate pop-up warning.
Ports are automatically sorted after pressing the Apply button.
Open Protocol and NTP
When using Open Protocol, the ports to be opened must be added manually in the Open additional TCP ports entry box. For example: 4545,4546,4547 (depending on the ports configured in Virtual Station > Virtual Station 1 > Protocols > Open Protocol > Server Port). When using an NTP server, port 123 must be added manually in the Open additional UDP ports entry box.
Multiple ports can be added by using comma separation. Port ranges can be added by using a dash.
IP Filtering (layer 3 firewall)
IP Filtering (layer 3 firewall) allows specifying trusted hosts or networks by entering their IP addresses in the IP White List entry box. To access the entry box, set the switch to On. Accepted entries are lists of IP addresses or network addresses in the form of IP tables, that is, host IP addresses or network IP addresses. The network mask can be entered as mask length (for example, /24) or as network IP address (for example, /255.255.255.0). Packets coming from a whitelisted IP address are immediately allowed. Other packets are screened by the other firewall layers (Port Filtering and MAC Filtering).
Due to security issues, entering host names or network names is not accepted.
Note that processes like NATing (Network Address Translation) may change source IP addresses. Consult your local network administrator when whitelisting a host based on source IP address is required.
MAC Filtering (layer 2 firewall)
MAC Filtering (layer 2 firewall) allows specifying trusted hosts or networks by entering their MAC addresses in the MAC White List entry box. To access the entry box, set the switch to On. Accepted entries are comma-separated lists of MAC addresses. Packets coming from a whitelisted MAC address are immediately allowed. Other packets are screened by the other firewall layers (Port Filtering and IP Filtering).
Invalid entries trigger an immediate pop-up warning.
Note that routing may change source MAC addresses. Consult your local network administrator when whitelisting a host based on source MAC address is required.
Packet counters
To view the packet counter values for each firewall layer, select Packet Counters. To refresh or reset the packet counter values, select the corresponding switch and release.
Firewall status
The status of the general firewall feature and its firewall layers is shown in the Firewall main view directly under Settings > Network.
Status | Description |
|---|---|
OK | The firewall is enabled and the firewall configuration is applied. |
Disabled | The firewall is disabled and the firewall configuration is not applied. |
Configuration Error | The firewall is enabled, but the firewall configuration is not applied due to an internal error. For safety reasons, the fail-open policy is applied, meaning all connections are allowed through. |
When the general firewall status is OK, the status (Enabled / Disabled) for the respective firewall layers is also shown.


