Square Drive Tool
Hydraulic Torque Wrench
产品信息
一般信息
切勿丢弃 – 请交给使用者
使用声明
仅供专业使用。
此产品及其附件不得以任何形式进行改造。
如果此产品已损坏,则不得使用。
如果产品上的产品数据或危险警示牌不再清晰可读或已脱落,请立即更换。
The product must only be operated and serviced by trained and qualified personnel.
安全警示语
危险、警告、小心和注意等安全警示语的意思如下:
危险 | 危险表示一种危险的情况,如果不能避免,将会导致死亡或严重伤害。 |
警告 | 警告表示一种危险的情况,如果不能避免,可能导致死亡或严重伤害。 |
小心 | 小心与安全警告标志一起使用,表示一种危险的情况,如果不能避免,可能会导致轻微或中等程度的伤害。 |
注意 | 注意用于指示与个人伤害无关的操作。 |
质保
产品保修在首次启用产品后 12 个月内有效,但无论如何,最迟应在交付产品后 13 个月内过期。
保修不包括部件正常的磨损和断裂。
“正常磨损和断裂部件”是指在工具常规维护期内,需要更换、进行其他调整/大修的部件(以时间、运行时数或其他形式表示)。
产品保修以工具及组件的正常使用、维护和修理为前提。
本保修不适用于在保修有效期内因维护保养不当或由 Atlas Copco及其授权维修服务合作伙伴之外的他方进行维修保养而造成的损坏部件。
要避免工具零配件损坏或断裂,请按建议的维护周期保养工具并严格遵守说明操作。
保修类修理仅在 Atlas Copco维修间或由获得授权的维修服务合作伙伴处理。
Atlas Copco通过ToolCover 合约提供延保及最佳的预防维护服务。有关详情,请联系您当地的服务代表。有关详情,请联系您当地的服务代表。
电动马达:
保修仅适用于未打开过的电动马达。
ServAid
ServAid 是一个持续更新的门户网站,含有技术信息,例如:
法规和安全信息
技术数据
安装、操作和维修说明
备件列表
附件
尺寸图
请访问:https://servaid.atlascopco.com.
如需进一步的技术信息,请联系您当地的 Atlas Copco代表。
安全数据表 MSDS/SDS
安全数据表描述了 Atlas Copco销售的化学产品。
有关更多信息,请访问 Atlas Copco网站 www.atlascopco.com/sds。
原产地
对于原产地,请参见产品标签上的信息。
尺寸图
尺寸图可以在尺寸图存档或 ServAid 上找到。
请访问:http://webbox.atlascopco.com/webbox/dimdrw或 https://servaid.atlascopco.com。
概览
产品技术数据
产品技术数据可以在 ServAid 或 Atlas Copco网站上找到。
请访问:https://servaid.atlascopco.com或 www.atlascopco.com。
保养概述
保养建议
建议定期进行预防性维护。请参见预防性维护的详细信息。如果产品工作不正常,请勿运行并对其检查。
如果未包含预防性维护的详细信息,须遵守一般操作指南:
彻底清洗相应的零部件
更换任何故障或磨损零部件
操作
人体工学指导准则
通读此一般人体工学指导准则列表时考虑您的工作台,找出在姿势、组件放置或工作环境方面可以改进的地方。
请频繁地间歇并更换作业位置。
根据需求和工作任务调整工作台区域。
通过确定需要放置零件和工具的位置调整出方便的范围,避免静态运功。
使用工作台设备,例如适合工作任务的桌椅。
避免作业位置高于肩部水平线或在装配操作期间静态持握工具。
在肩部水平线以上位置作业时,通过减轻工具重量来减少静态的肩部肌肉负担,例如使用扭矩臂、软管卷盘或重量平衡器。您也可以通过在近身位置持握工具来减轻静态的肩部肌肉负担。
经常休息。
避免肩部或腕部使用极端姿势,尤其在需要使用一定力量的操作过程中。
调整出方便的视野,使眼睛和头部的运动最少。
处理工作任务时使用适当的照明。
处理工作任务时选择适当的工具。
在嘈杂的环境中,请使用护耳设备。
使用高质量插入式工具和消耗品以最大限度减少暴露于过度振动的情况。
操作说明
Electric Connections
Ensure proper power availability to prevent motor failure or dangerous electrical overloading. Use the recommended amperage listed on the motor nameplate. Do not use electric pump if ground is not connected on plug.
尽量缩短延长线的长度,确保电线具有适当的线径并接地。
Extension cord should be #10 AWG gauge.
General Setup
All our hydraulic torque wrenches are supplied completely assembled, ready for use. An Atlas Copco hydraulic power pack, for use with your Atlas Copco hydraulic torque wrench, is recommended to provide the speed, pressure and portability that make your Atlas Copco System efficient and accurate.
The accuracy of your Atlas Copco hydraulic torque wrench is +/-3% based upon our manufacturer's specifications. This accuracy is certified through calibration tests conducted by Atlas Copco or any other qualified calibration facility whose program is traceable to the National Institute of Standards and Technology (N.I.S.T). We strongly suggest using Atlas Copco certified gauges (with a class 1 accuracy) to enhance the accuracy your torquing system.
液压连接
Our hydraulic pumps are equipped with a zero-pressure relief valve. However, it could be possible that the retract side remain pressurized after the pump has been switched “off”. This trapped pressure prevents the user from loosening the retract-side fittings by hand. To release the pressure, simply push the black button on top of the solenoid. All fittings are free to be manually tightened.
Never disconnect or connect any hydraulic hoses or fittings without first unloading the wrench and the pump. If the system includes a gauge, double check the gauge to assure pressure has been released. When making connections with quick disconnect couplings, make sure the couplings are fully engaged. 如配件、仪表等螺纹连接处必须保持清洁、牢固拧紧且无泄漏。
空气连接
Ensure that you have sufficient air flow (58 up to 100 PSI / 4 up to 7 bar) to operate you pneumatic pump. If in doubt, compare the pump manufacturer's recommended air flow rating prior to pressurizing pump. Improper air flow may damage the pump motor.
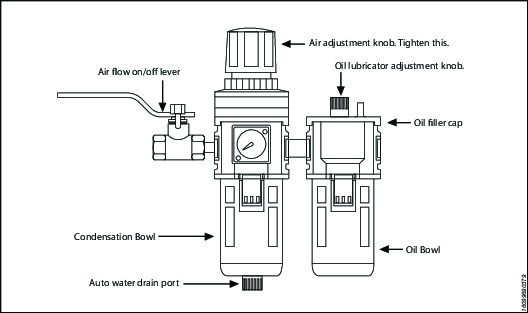
For best results use air hoses equal or larger than 3/4” internal diameter.
Use of a F.R.L. (Filter Regulator Lubricator) is highly recommended. Fill with oil and adjust the air admission with the adjustment knob.
工作压力
The tool's maximum working pressure is 10,000 psi (700 bar). Make sure that all hydraulic equipment (pumps, hoses, couplers) used with this tool are rated for 10,000 psi (700 bar) working pressure. Review the documentation for the hydraulic pump in use to ensure pressure does not exceed 10,000 psi.
连接系统
The Atlas Copco hydraulic torque wrench and the power pack are connected by a 10,000 psi (700 bar) operating pressure twinline hose assembly. The safety ratio of the Atlas Copco hydraulic hose is 4/1. On each twin hydraulic hose, one line must be MALE-MALE and the other line must be FEMALE-FEMALE in order to assure a correct interaction between pump and machine. Connect the twinline hose to the swivel as shown:
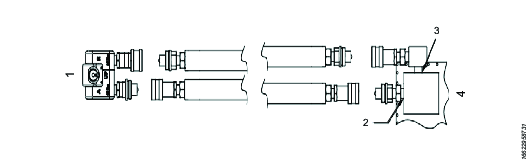
参考 | 说明 |
|---|---|
1 | 扳手 |
2 | 端口 A |
3 | Port 'R' |
4 | 泵 |
Check all coupler connections because, after the system has been pressurized, you will not be able to tighten the couplers by hand and using tools will damage the couplers.
Check all coupler connected properly with no gaps between collar and fittings. Never use spanners and other tools to tighten or loose couplers.
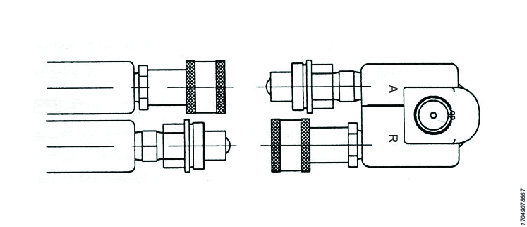
Ensure connectors are fully engaged and screwed snugly together.
Never use two twin hydraulic hoses between pump and machine. If so, you have the high pressure on the retract side and your machine will not work properly. To avoid tool malfunction, do not reverse connectors. Do not try to loosen the swivel assembly at any moment.
操作泵
Setting Working Pressure on the Pump
请遵循以下程序设置 Titan 泵的压力:
Loosen the knurled locking ring below the "T" handle on the pump's external pressure regulator. Then turn the "T" handle counter clockwise (CCW) until it turns freely and easily.
Turn the pump "on". Using the pump's remote control pendant, push down the advance switch (or button on air pumps) and hold it.
While holding the pump in the advance mode, slowly turn the "T" handle clockwise and observe the pump pressure gauge rise.

Always adjust the regulator in order to increase the pressure up - Never down. 严禁在施以压力时使用工具调整液压调节器。
When your gauge reaches 4,000 psi stop turning the "T" handle and let the gauge settle out.
If the pressure continues to rise (above 4,000 psi), release the advance button and back off your pressure slightly-by turning CCW on the "T" handle. Then re-depress the advance switch on you remote and slowly bring pressure up to 4,000 psi again.
When the pressure is correct, turn the pump "off" and tighten the knurled lock nut provided under the "T" handle. This sets pump pressure, which determines torque tool output.
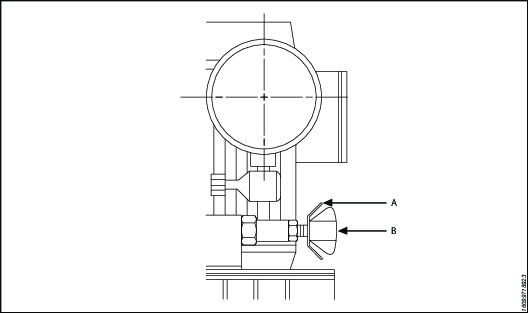
参考
说明
A
联轴器环
B
T - Handle
Once your target pressure is set and locked, cycle the pump once more to ensure that your pressure setting did not change as you turned down the knurled knob.
Applying Torque to Wrench
Having set your target pressure, cycle the tool three or four times to full pressure. Cycling the tool ensures that the system is operating properly and removes trapped air, if any.
Verify that any impact sockets used are rated to accept the full torque output of the tool they are to be used with. Ensure the correct size impact socket for the nut A/F has been selected, placed on the square drive and secure with a locking pin and ring.
Place the tool and the socket on the nut, making sure that the socket has fully engaged the nut, check that the drive retainer is engaged.
确保反作用力臂牢牢地紧靠在固定的物体上(即相邻的螺母、法兰、设备壳体等)。 When positioning the wrench, make sure that the hose connections are well clear of any obstructions and that all body parts are safely out of harm's way. 然后,只有在此时,才可以向系统施以瞬时压力,以确保工具放置恰当。 If it doesn't look or act right, stop and re-adjust the reaction arm.
Read Safety Instructions supplied with the torque wrench for further guidance on tool usage.
By pushing down on the remote control button in the advance position, the rear of the tool will be pushed back until its reaction arm will contact its reaction point.
Continue to hold down the button as the socket turns until you hear an audible "click" which will signify the hydraulic cylinder inside the tool is fully extended and will not turn the advance further.

Continuing to hold down the remote control button will result in a rapid build up of pressure to the point of where the gauge reads what was preset prior to applying the wrench.
注:活塞展开后的预设压力读数并不表示设置的扭矩适用于螺栓。 It only indicates that the cylinder is fully extended and cannot turn the socket or the ratchet link further until the tool automatically resets itself.
Releasing the remote control button will retract the cylinder. The tool will automatically reset itself and the operator will hear an audible "click" indicating he can again push the remote control button and the socket will turn. Each time the cylinder is extended and retracted, it is called a cycle. Successive cycles are made until the tool "stalls" at the pre-set Torque/psi with an accuracy of +/-3%. Repeatability is +/- 1%.
Always attempt one final cycle to ensure the "stall" point has been reached.
Should the tool "lock-on" after the final cycle, push down on the remote control button once more (to build pressure) and, while maintaining this pressure, pull back on the external disengagement lever (RT) or reaction Pawl (RTX). Releasing the remote control while continuing to hold back on the pawl lever/reaction pawl will allow the tool to be removed easily.
Loosening Procedures
First, set the pump to 9,000 psi (Do not try directly at 10.000 psi). Change the drive and the reaction arm to the loosening mode (Left = Loose), assuring the reaction arm abuts squarely off a solid reaction point. Press and hold the remote control button down. Pressure will decrease as the socket begins to turn. As the cylinder extends fully, you will hear an audible "click". Release the remote control button, and the cylinder automatically retracts, at this time you will again hear the audible "click". 5. 运行该工具,直至紧固件可用手拆卸为止。
If the bolt does not loosen with the above procedure, it is an indication that you need a larger tool to loosen the bolt.
Setting Torque
All Atlas Copco power packs operate at a pressure range from 500 to 10,000 psi and are fully adjustable. They have been engineered and designed for portability and high flow for increased speed. Before using your Atlas Copco power pack, check the following points.
Is the reservoir filled with oil?
Where is the closest electrical outlet at the job site?
Is there enough air pressure (60 to 100 psi) and Air flow at the job site? (Air units only)
Is the gauge mounted and rated for 10,000 psi / 700 bar?
工作压力
The pump's maximum working pressure is 10,000 psi / 700 bar. Make sure all hydraulic equipment and accessories are rated for 10,000 psi / 700 bar operating pressure. Hydraulic pumps are available with higher pressure outputs, if not using an Atlas Copco power pack verify maximum operating pressure of the unit being used and ensure the system maximum operating pressure (10,000 psi / 700 bar) is not exceeded.
液压连接
Never disconnect or connect hydraulic hoses or fittings without first unloading the wrench. Unplug the electrical cord of the pump, and open all hydraulic controls several times to assure that the system has been depressurized. If the system includes a gauge, double check the gauge to assure pressure has been released. When making a connection with quick disconnect couplings, make sure the couplings are fully engaged threaded connections such a fittings, gauges etc. must be clean and securely tightened and leak free.
Loose or improperly threaded couplers can be potentially dangerous if pressurized, however, severe over tightening can cause premature thread failure. 须要确保接头旋紧且不会发生泄漏。严禁抓取、触摸或以任何方式接触液压泄漏物。漏油可穿透皮肤,进而造成伤害。 Do not subject the hose and potential hazard such as sharp surfaces, extreme heat or heavy impact. Do not allow the hose to kink and twist. Inspect the hose for wear before it is used.
Electrical Power
Check the proper electrical supply before connecting.
This motor may spark. Do not operate in an explosive atmosphere or in pressure of conductive liquids.
Do not use a power or extension cord that is damaged or has exposed wiring.
All single phase motors come equipped with a three prong grounding type plus to fit the proper grounded type electrical outlet. Do not use a two prong ungrounded extension cord as the pump's motor must be grounded.
比较电机铭牌值与电力供应值,防止电机被烧坏或发生危险的电压过载情况。
Prior to Use
Check hydraulic oil (Use Atlas Copco maximiser range Grade 46) level to prevent possible pump burnout. Open the filler plug located on the reservoir plate. Look at oil fill level on the oil sight gauge. The oil level should be approximately 2" from the top of the reservoir plate- with motor off. Add oil as necessary. Do not mix different grades of oil. Make sure all desired gauge, valve, hose and quick coupler connections are tight and secure before operating. The use of a pressure gauge is required for normal pump operation. Mounted on the manifold, the gauge permits the operator to monitor the load on the wrench. Class1 certified calibrated gauges are available for most applications.
Operating Square Drive
Changing Drive Direction
To remove the square drive, push the round button on the drive retainer and gently pull on the square end of the square drive (for RT20, 25 & 50, push on the drive retainer while turning it counter-clockwise). To insert the drive in the tool, place the drive in the desired direction, engage drive and bushing splines, then twist drive and bushing until ratchet Spline can be engaged. Push drive through ratchet.
Push drive retainer button, engage retainer with drive and release button to lock the square drive in position.
反应臂
All Atlas Copco hydraulic torque wrenches are equipped with a universal reaction arm. These reaction arms will absorb and counteract forces created as the unit operates. The reaction arm should extend in the same direction of the square drive; however, slight adjustments may be made to suit your particular application. The RT reaction arm is made of special aircraft alloy and is 360° adjustable.
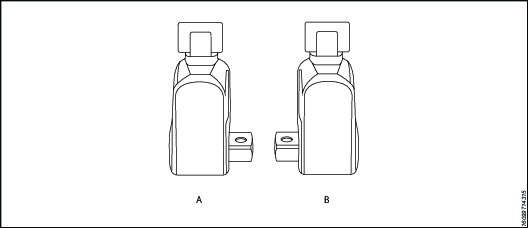
参考 | 说明 |
|---|---|
A | Right = Tight |
B | Left = Loose |
The standard RT reaction arm cannot be welded on and should not be modified.
The reaction arm for all RT Monobloc Housing is splined to slide over the rear (cylinder) portion of the tool. In operation, the reaction arm must be fully engaged and secured by inserting the spring loaded reaction arm lever at the base of the housing (end cap). 确保反作用力臂在操作之前完全接合。
Setting Torque
Once the system is fully connected and proper power supply available, the operator may now adjust the pump pressure to the level needed for the application.
When tightening, use the manufacturer's specifications to determine the torque value which you will ultimately require.
Torque sequence may vary from plant to plant and even within individual plants, depending upon the gasket material, etc. Always follow local procedures.
Refer to the pressure-torque conversion table applicable to the tool which you intend to use, Torque chats are available on ServAId .
Square/Allen Drive Working Torque
驱动器尺寸 The square or hex drive of each drive is limited in its maximum output by its material and its engagement area. Since Atlas Copco uses a specially suited alloy-steel for its drive members, the following maximum torque output can be achieved without drive failure, provided the reaction member abuts close to the same plane as the nut to be turned.
If the reaction arm cannot abut on the same plane as the nut to be turned, less torque should be applied, as the additional side load has to be taken into consideration. When toque requirements are close in excess of the values listed above, use RT's/-9/ Sockets Hex-Drive with replaceable Hex Insert Bits.
RT series is available with square drive (standard) or option hexagonal/Allen drive. The table below reviews ideal working range for the respective drives.
驱动器尺寸 Inch or mm | 启动器类型 | 最大工作压力 | Probable Failure | ||
ft lb | Nm | ft lb | Nm | ||
1/2" | HEX: | 353 | 478 | 392 | 531 |
1/2" | 正方形 | 367 | 497 | 408 | 553 |
5/8" | HEX: | 689 | 934 | 766 | 1038 |
3/4" | HEX: | 1191 | 1614 | 1324 | 1794 |
3/4" | 正方形 | 1239 | 1679 | 1377 | 1865 |
7/8" | HEX: | 1892 | 2565 | 2102 | 2848 |
1" | HEX: | 2824 | 3827 | 3138 | 4252 |
1" | 正方形 | 2937 | 3980 | 3263 | 4422 |
1 - 1/8" | HEX: | 4021 | 5448 | 4468 | 6054 |
1 - 1/4" | HEX: | 5516 | 7474 | 6129 | 8304 |
1 - 3/8" | HEX: | 7341 | 9948 | 8157 | 11053 |
1 - 1/2" | HEX: | 9531 | 12915 | 10590 | 14350 |
1 - 1/2" | 正方形 | 9912 | 13432 | 11014 | 14924 |
1 - 5/8" | HEX: | 12118 | 16420 | 13465 | 18245 |
1 - 3/4" | HEX: | 15135 | 20508 | 16817 | 22787 |
1 - 7/8" | HEX: | 18616 | 25224 | 20684 | 28027 |
2" | HEX: | 22593 | 30613 | 25103 | 34015 |
2 - 1/4" | HEX: | 32168 | 43588 | 35742 | 48431 |
2 - 1/2" | HEX: | 44126 | 59791 | 49029 | 66435 |
2 - 1/2" | 正方形 | 45891 | 62183 | 50990 | 69092 |
12mm | HEX: | 298 | 404 | 331 | 449 |
17mm | HEX: | 847 | 1147 | 941 | 1275 |
19mm | HEX: | 1182 | 1602 | 1313 | 1780 |
22mm | HEX: | 1835 | 2486 | 2039 | 2763 |
24mm | HEX: | 2382 | 3228 | 2647 | 3587 |
27mm | HEX: | 3392 | 4596 | 3769 | 5107 |
32mm | HEX: | 5647 | 7652 | 6275 | 8502 |
36mm | HEX: | 8040 | 10895 | 8934 | 12105 |
41mm | HEX: | 11878 | 16094 | 13197 | 17882 |
46mm | HEX: | 16774 | 22730 | 18638 | 25255 |
50mm | HEX: | 21542 | 29190 | 23935 | 32433 |
维修
维护说明
保养和维护建议
进行工具的操作、修理或维护工作或者更换工具附件或靠近操作现场时,要戴上耐冲击的眼部和面部护具。
仅在整个系统处于零压力时才能进行所有检查、维护或修理工作。
为了获得最佳性能,要经常检查工具、动力装置、软管、连接器、电线及附件是否存在可见损坏。务必遵循工具和泵的维护说明。
保养间隔指南
接受过正规培训的人员按照正确的维护计划使用液压扳手,方可确保长期无故障地使用。但所有工具在长期使用后都会磨损。影响工具寿命的因素:
高循环率
高负载使用
冲击
在脏污、高温或潮湿的环境中操作
不同的反作用力方法
维护不当
建议定期润滑和检修,以确保扳手保持良好的工作状态。如果在高扭矩、高周期率或长拧紧时间条件下使用,则保养间隔应更频繁。如果扳手不能正常工作,应立即将其取下检查。
以下保养间隔仅供参考。每个用例和应用都不一样,因此最终用户有责任针对工作环境和使用实施适当的有计划维护。记录工具操作情况。此记录有助于规划工具或部件的维修、校准和更换。
轻型
例如:很少在低压下使用,容量 <40%。
润滑:每 6 个月
检修:每 12 个月
正常负载
例如:常规使用,容量 <80%。
润滑:每 3 个月
检修:每 12 个月一次,包括更换驱动销。请参阅润滑部分。
重负载
例如:在任何压力下持续使用;使用 >80% 容量;定期使用以松开腐蚀的螺栓。
润滑:每个月
检修:每 6 个月一次,包括更换驱动销和驱动棘爪。请参阅润滑部分。
工具更换
产品所有者必须实施符合工具更换政策的维修计划。该政策确保在工具失效之前进行更换。由于操作环境和工具维护的潜在差异,很难定义工具的使用寿命。
若存在明显的磨损痕迹(如划痕、凹痕或材料缺失),表明工具已失效。对出现磨损迹象的工具进行维修。为使工具保持良好状态,应更换损坏的部件。若工具的压力承载部件或反作用力臂出现严重损坏,则出于安全原因,应移除该工具。
更多信息,请参阅维修间隔指南。
预防性维护
为了保持液压扭矩扳手系统处于良好的工作状态,请在每次使用后执行以下维护步骤。
擦拭干净所有外表面,目检工具是否有损坏迹象。必要时进行调查。
检查所有液压接头和连接是否有液压泄漏迹象。必要时进行调查。
确保所有液压联轴器清洁且无碎屑。
检查整条软管;查看是否有切口或擦伤。密切注意锻造的端部,查看是否有任何泄漏迹象。
如果设备处于良好的工作状态,可喷上合适的防锈油,如 Shell Ensis 或 Castrol Rustillo,并储存好以备下次使用。
检修说明书
将扳手连接到泵上。
执行压力测试,以确保所有机构均按预期运行。
调查任何故障或液压泄漏。
给系统减压并断开所有联轴器。
拆卸扳手。
更换所有密封件和弹簧。
更换驱动销。
更换有损坏或磨损迹象的任何其他部件。
重新润滑并重新装配扳手。
执行压力测试,以确保所有机构均按预期运行。
校准扳手以确保扭矩输出符合预期。
润滑说明
润滑剂指南
驱动组件 | Molykote 1000 |
密封件 | Rocol Sapphire Aqua-Sil |
紧固件 | Loctite 243 |
锥形液压螺纹 | Loctite 577 |
润滑
为使扳手保持良好的工作状态,在保养间隔期内定期对驱动部件进行润滑。
润滑前拆卸:
拆下方形驱动头。
拆下检修塞 [×2]。
拆下集尘罩螺钉 [×2] 和集尘罩。
拆下固定夹 [×2]。
拆下驱动套筒 [×2]。
将驱动销与检修塞孔对齐。将销推出外壳以释放驱动组件。
从外壳上拆下驱动组件。
在润滑维护期间执行以下操作:
检查驱动销有无磨损或损坏迹象。如有必要,更换驱动销。
检查棘轮齿边缘是否有损坏迹象。如有必要,更换棘轮。
检查驱动棘爪齿是否有损坏迹象。如有必要,更换驱动棘爪。
检查驱动棘爪弹簧是否有损坏迹象。如有必要,更换弹簧。
用 Molykote 1000 润滑阴影区域。
组装程序与拆卸程序相同,但相反。
疑难解答
Troubleshooting of Hydraulic Torque Wrench
Tool failure, although rare, does occur. Such failure is most often in the hydraulic couplers or hoses. These items are repairable or replaceable immediately, since they are available universally. Failures of structural members of the tool are quite rare, however, replacement parts are available from stock. All repairs to Atlas Copco tools may be made by reasonably experienced individuals according to the aforementioned instructions. Otherwise, please contact Atlas Copco to schedule a quick repair of the tool.
Recommended Service intervals are :
Heavy duty use or use in corrosive/harsh environments – every 3 months internal drive components may require frequent inspection and re-lubrication under heavy duty cycles, e.g. weekly.
Normal use – every 6 months.
Light or infrequent use – every 12 months.
Troubleshooting Powerpacks
Atlas Copco Hydraulic Power Packs are precision-built units and, as such, do require a certain amount of care and maintenance
Hydraulic Oil should be completely changed after every 300 hours of operation, or at least twice a year. Always make sure the reservoir is filled with fluid. Always use Atlas Copco Maximizer range of oils for best performance.
Couplers and fittings should be checked periodically for leaks. Dirt or foreign materials should be kept away from fittings. Clean before use.
Hydraulic Gauge: TITAN 压力表内注入了液体。如果此液位下降,表示有外部泄漏,需要更换。如果压力表内出现液压油,表示有内部损坏,不应继续使用。
Filter on Pump: The filter should be replaced twice a year in normal use and more often if the pump is used daily or in a dirty, harsh environment.
遥控器 (Air Unit) The airline to the remote control unit should be checked for obstructions or kinks in the line periodically. If there is a bend or break in the line, it must be replaced. The spring- loaded buttons on the remote handle should be checked in the event of operating difficulties. (Electric Unit) The switch buttons should be checked periodically if any indications of problems exist.
Air Valve: This valve should be checked twice a year.
Armature: (Electric Unit) Check yearly.
Pumping unit: 每 2 年应对泵进行一次彻底检查。可以由 TITAN 或合格的液压维护中心进行检查。
Troubleshooting Routines
测试 1
Attach hoses to pump and tool in the normal manner.
Press the advance button and hold it down.
If the pump pressure builds and the hoses "flex" but the tool still refuses to cycle, the problem is most likely a loose or defective coupling connection. To find out where the bad coupling is, remove the tool from the hoses and marry the loose ends together and cycle the pump. If the gauge pressure reads no more than 500 PSI, then the bad fitting is on the tool. A significantly greater pressure indicates that the problem is in either the pump or a hose fitting.
测试 2
Remove screws from pump motor to reservoir, slide pump motor to the back while keeping pistons into oil.
Turn pump on. If you have no oil coming out from the solenoid tube, change the solenoid.
Tight the regulating valve to maximum, Push on the advance button and while holding down, look if any oil is coming out from the regulating tube. If oil is coming out, change the regulating valve.
测试 3
Remove tool from hoses.
Cycle pump.
If pump fails to build pressure, the problem is with the pump. If it does build pressure, the problem is with hydraulic blow-by in the tool.
测试 4
This test should be run prior to every use of an Atlas Copco Tool
Connect the tool, pump and hoses together as normal.
Cycle the pump several times.
Cycle the system once more and observe the sequence of operation.
As you depress the advance button, the tool drive shroud turn about 24 degrees and you should hear an audible "click". You will also notice that the disengagement levers will move to the rear of the tool and spring forward.
At this point, release the advance button. You should see no further movement and after a moment you will hear another audible "click". This is how the tools are designed to operate.
If you observe any other sequence of operation, the system is out of order and cannot deliver more than 10% of its designed capacity.
Take immediate corrective action. For reference, tools and pumps are designed from the factory plumbed as follows. This ensures that the tool, pump and ONE hose cannot possible be connected up incorrectly.
测试 5
工具 | 软管 | 泵 |
|---|---|---|
Advanced Side-Male | Advance side- Female to Female | Advance side-Male |
Retract side-Female | Retract Side-Male to Male | Retract Side-Female |
Note that connecting two (or any even numbers) of hoses together creates "one" hose which is plumbed backwards! Male to Female and Female to Male. This will cause the system to operate backwards per Test #5 above. If you hose isn’t long enough, connect 3 hoses together, move your pump or call Atlas Copco for a longer hose assembly.
故障排除症状和所需的操作
症状 | 可能的原因 | Required Action |
|---|---|---|
Gauge shows pressure build-up but the tool will not cycle | Couplings are loose or not working. Solenoid is not working | Tighten and/or replace couplings. Use Test #1 to isolate problem Use test #2. if not working replace solenoid |
Cylinder will not retract | 1.See above. | 1.请参见上文 |
2.Voltage to electric pump is too low to line drop or inadequate amperage is available. | 2. Get shorter extension cord or upgrade to 12AWG, 25 amp rating or better. | |
3.Linkage between piston rod and drive pawl are broken. | 3.视需要更换气缸。 | |
Cylinder pressure will not build | 1. Oil blow by in tool (Piston seal leak, blown O-ring, cracked piston) | 1.更换机械零件请联系 Atlas Copco 代表。 |
2. Pump Problem. | 2. Remove screws from pump motor to reservoir, slide pump motor to the back while keeping pistons into oil. Turn pump on. If you have no oil coming out from the solenoid tube, change the solenoid. 2A If pump sounds like a lot of pebbles in a tin can, the problem may be a worn motor coupling-remove motor from base plate-using a pair of needle nose pliers removes the motor coupling-if worn replace. 请联系 Atlas Copco 代表。 2B If pump sounds like a lot of pebbles in a tin can, the problem may be a worn motor coupling-remove motor from base plate-using a pair of needle nose pliers removes the motor coupling-if worn replace. 请联系 Atlas Copco 代表。 2C。 Air pump- Fault FRL due to excessive moisture and/or dirt in air supply. Disassemble and change. 请联系 Atlas Copco 代表。 2D。 Air pumps- Replace faulty remote control valve cartridge. | |
Cylinder/tool leaks | 1. Safety relief valve on swivel has lifted. | 1A Tighten all hose and couplers. If leak continues, adjust safety setting – Test #4. 1B Check to see if the system is properly plumbed by running test #5 (high pressure on retract side will lift the safety relief valve). |
2. Blown O-ring in cylinder. | 2. Replace O-Ring with proper high pressure O-Ring. 请联系 Atlas Copco 代表。 | |
3.Defective gland seal. | 3. Replace gland seal. 请联系 Atlas Copco 代表。 | |
Tool operates backwards | 1. Couplings reversed. | 1. Run test #5. Replumb system as necessary. |
2. Multiple hoses in even numbers. | 2. As plumbed, Atlas Copco hoses may only be joined together in odd numbers ONLY if it is necessary to use 2, 4, 6 hoses-make an adapter from spare high pressure couplings and nipples. | |
棘轮在内缩行程中返回 | Broken or otherwise inoperable reaction pawl. | |
Ratchet will not take successive strokes. | 1. Broken or otherwise inoperative drive pawl or spring. | 1. Replace drive pawl and/or spring. 请联系 Atlas Copco 代表。 |
2. Cylinder not retracting completely. Ratchet will not take successive strokes. | 2.Remove tool from nut and cycle freely for several strokes. If problem persists, check pawls. 2A Operator not allowing adequate time for cylinder to retract fully | |
3. Linkage between piston rod and drive plates is broken. | 3. Replace parts as necessary -Contact Atlas Copco service. | |
Tool locks onto nut. | 1. Reaction pawl is loaded when the tool is maxed out in torque. | 1. Press advance button on remote and build pressure- continue to press down on remote while pulling back on one of the disengagement levers- release remote while continuing to hold back on levers. |
2. Tool is operating backwards. | 2. Push advance button down-tool should immediately fall free- Run test #5. | |
3.Tool is wedged under a fixed object. | 3. Remove shroud from around ratchet. Using any tool available, pry the drive pawl out of the ratchet and at the same time pull back on the disengagement levers. Tool should swing free or turn away the socket or obstruction. | |
Gauge records no pressure | 1. Gauge connection is loose. | 1. Tighten coupling. |
2. Bad gauge. | 2.更换压力表 | |
3.泵不会产生压力 | 3. See cylinder will not build pressure above. See cylinder will not build pressure above. | |
4. Tools seals are blown. | 4. Replace defective seals. 请联系 Atlas Copco 代表。 |
故障排除症状和所需的操作
症状 | 可能的原因 | Required Action |
|---|---|---|
泵不会产生压力 | 1. Air Electric supply is low. | 1.检查气压调节器 |
2. Defective relief or regulator valve. | 2. Replace valve. 请联系 Atlas Copco 代表。 | |
3. Low oil or clogged filter. | 3. Fill reservoir and clean filter. | |
4. Internal leak in oil line from external relief valve to pump body. | 4. Open reservoir, inspect oil line while trying to build pressure- if leaking tighten fittings or replace. | |
5. Defective Solenoid or regulating valve. | 5. See “Cylinder will not build pressure-#2 above” | |
Motor sluggish and inefficient “sounds sick” slow to build pressure. | 1. Air or electric supply is low. | 1. See #1 in preceding block |
2. Clogged filter. | 2.清洁或更换过滤器 | |
Pump heats up. | 1. Improper use. | 1. Operator is continuing to hold down on the advance stroke after the cylinder has reached end of stroke- this causes a lot of oil to go through a very small hole in relief-valve- causing heat build-up. Have operator release advance stroke after disengagement levers spring forward. |
2. Remote control is left in “on” position when pump is not actively in use. | 2. Turn pump off whenever not actually being used. DO NOT leave pump running when tool is not in use. | |
Pump cannot reach 10,000 psi, only 9,000psi | Change regulating valve | 1A.Remove 3 screws of 4 port block manifold IB. Remove regulating valve IC: Replace new regulating valve ID: Don’t forget metal ring ie Check o’rings on block manifold 如果在驱动装置处于待机状态时, Replace block manifold IG. Place 1 drop of loctite on each screw IH. Tighten screws firmly - double check screws are fully tightened. |
Pressure can’t reach 4,000 psi | Change cut off valve(s) | IA. Remove the pump from tank IB. Change cut-off valves 3,250 psi /70 bar 90% Chance pump is workingIB. Change cut-off valves 3,250 psi /70 bar 90% Chance pump is working IC: If pump can’t get 10,000 psi change cut-off valve 1,250 psi/350 bar |
Pressure not stable (big variation) | Change solenoid (115v), (220v) | IA. Remove top solenoid IB. Replace new top solenoid IC: O 形环损坏 |
Pressure not stable (small variation) | Change check valves Part# 20374 Need special tooling | IA. Remove the pump from tank IB. Replace check valve IC: Do not tight too much |
No pressure | Check piping | IA. Remove the pump from tank or Check piping couplers IB. Check t-coupler inside the pump |
Uncontrolled pressure | 1. Check coupling Part#10190 | IA. Remove the pump from the tank IB. Remove piping IC: Remove block pump (screws# 20444) ID: Check attentively coupling ie Do not forget to replace keys(part #10184) |
2. Check pumps Part# 10168-10169-10170 | 2A Remove the pump from the tank 2B Untighten pump’s screws 2C。 Check seals 2D。更换 2E。 Tighten firmly |
故障排除症状和所需的操作
症状 | 可能的原因 | Required Action |
|---|---|---|
Motor doesn’t run | 1.Check fuse 16 a Part# 10064 | 1. Change fuse 16 a (white - on top) |
2. Check electrical box | 2. Check for disconnection | |
3. Check 115v cord | 3.Check for wire cut or disconnect | |
4. Check plug | 4. Check for wire disconnect | |
5.Check remote control | 5. Check for wire disconnect | |
Motor start difficult | 1. Bearing Part#10198 & 10178 | IA. Remove the pump from the tank IB. Remove block pump IC: Disassemble block pump ID: Change bearing |
2. Remote control handswitch small white plastic support | 2A Open the hand switch 2B. Replace small plastic parts | |
Blown fuses when starting | Check if fuse 16 a is blown Part# 10064 | To avoid the problem don’t run motor If hydraulic hose are not connected |
Hose or tool fitting is damaged or leaks. | 1. Broken or melted plastic outer covering. | 1. If underlying plastic is still intact continue operation. Inspect frequently.If underlying plastic is still intact continue operation. Inspect frequently. |
2. Frayed plastic strands. | 2. Cut hose in half and discard. Replace hose. | |
3. Oil leaks through fibres. | 3. Cut hose in half and discard. Replace hose. | |
4. Broken fittings. | 4. Remove old fitting and replace with STEEL high pressure fittings only. After changing fittings, always run test #5 to insure proper plumbing. | |
Electric pump will not run | 1. Loose electric connections in control box. | 1. Open control box and visually inspect for loose threaded or push-on connectors. |
2. Motor burned up. | 2. Replace motor components whichever is necessary. 请联系 Atlas Copco 代表。 | |
保险丝 | 3.更换保险丝。 |