Product Information
General Information
Safety Signal Words
The safety signal words Danger, Warning, Caution, and Notice have the following meanings:
DANGER | DANGER indicates a hazardous situation which, if not avoided, will result in death or serious injury. |
WARNING | WARNING indicates a hazardous situation which, if not avoided, could result in death or serious injury. |
CAUTION | CAUTION, used with the safety alert symbol, indicates a hazardous situation which, if not avoided, could result in minor or moderate injury. |
NOTICE | NOTICE is used to address practices not related to personal injury. |
Warranty
Product warranty will expire 12 months after the product is first taken into use, but will in any case expire at the latest 13 months after delivery.
Normal wear and tear on parts is not included within the warranty.
Normal wear and tear is that which requires a part change or other adjustment/overhaul during standard tools maintenance typical for that period (expressed in time, operation hours or otherwise).
The product warranty relies on the correct use, maintenance, and repair of the tool and its component parts.
Damage to parts that occurs as a result of inadequate maintenance or performed by parties other than Atlas Copco or their Certified Service Partners during the warranty period is not covered by the warranty.
To avoid damage or destruction of tool parts, service the tool according to the recommended maintenance schedules and follow the correct instructions.
Warranty repairs are only performed in Atlas Copco workshops or by Certified Service Partners.
Atlas Copco offers extended warranty and state of the art preventive maintenance through its ToolCover contracts. For further information contact your local Service representative.
For electrical motors:
Warranty will only apply when the electric motor has not been opened.
ServAid
ServAid is a portal that is continuously updated and contains Technical Information, such as:
Regulatory and Safety Information
Technical Data
Installation, Operation and Service Instructions
Spare Parts Lists
Accessories
Dimensional Drawings
Please visit: https://servaid.atlascopco.com.
For further Technical Information, please contact your local Atlas Copco representative.
Safety Data Sheets MSDS/SDS
The Safety Data Sheets describe the chemical products sold by Atlas Copco.
Please consult the Atlas Copco website for more information www.atlascopco.com/sds.
Signs and Stickers
The product is fitted with signs and stickers containing important information about personal safety and product maintenance. The signs and stickers shall always be easy to read. New signs and stickers can be ordered by using the spare parts list.

Country of Origin
For the Country of Origin, please refer to the information on the product label.
Dimensional Drawings
Dimensional Drawings can be found either in the Dimensional Drawings Archive, or on ServAid.
Please visit: http://webbox.atlascopco.com/webbox/dimdrw or https://servaid.atlascopco.com.
Overview
Applications
Torque arms are used for assistance when operating hand held tools such as screwdrivers and nutrunners. The torque arms in the SMC series have a large working range, are easy to position and handle. They are designed for heavy duty operations over a long period of time. The torque arms makes assembly more stable and reduces wear on accessories like bits and taps. It is recommended to use the SMC series of torque arms together with a balancer.
The torque arms reduces the strain on the operators arm, wrist and shoulder by reducing vibration, torque and weight during repeated actions. Even small amounts of repeated actions can lead to repetitive strain injury.
Technical data
|
Ordering No |
4390153485 |
|
Model |
|
|
Length max |
mm |
|
Length max |
in |
|
Length min |
mm |
|
Length min |
in |
|
Max tool holder swivel angle ω |
deg |
|
Max torque |
Nm |
|
Max torque |
ft lb |
|
Weight |
kg |
|
Weight |
lb |
Technical Product Data
Technical Product Data can be found on either ServAid, or the Atlas Copco website.
Please visit: https://servaid.atlascopco.com or www.atlascopco.com.
Installation
Installation Instructions
Installing the SMC torque arms in trolley and rail systems
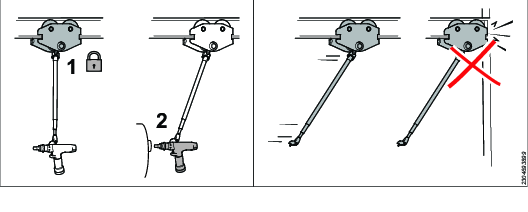
Do not modify the torque arm or the torque arm attachment. The installed torque arm must be able to swivel in all directions.
Installing the torque arm
The tool torque should not exceed the specified torque range of each specific arm.
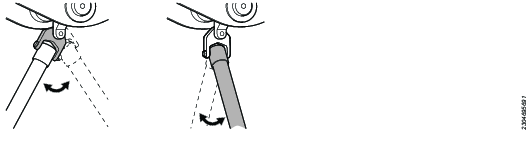
The angle of tool holder attachment, ω, is limited to 0° at SMC Posi 3 to achieve proper accuracy for positioning.
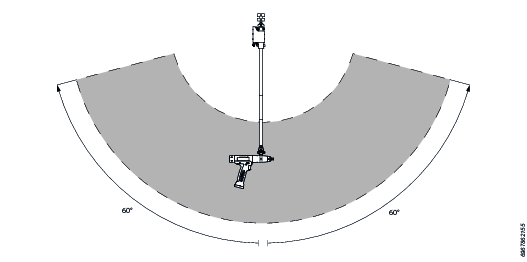
Mounting on a ceiling
Put the mounting point straight above, or as close as possible to, the point where the torque is applied.
Make sure that the fixation point can handle the weight and the torque of the chosen torque arm.
Attach the safety wire (see Spare Parts) to a second point that does not limit the working area.
Attaching and balancing the tool when mounted on the ceiling
Mount the arm straight above, or as close as possible to the work area.
Attach the tool holder to the tool.
Attach the tool holder to the arm.
SMC 12/25 (M6) - 10 Nm
SMC 50/100 (M8) - 24 Nm
Install the set screw on the tool holder and tighten it to 2.5 Nm.
Attach a balancer to the torque arm by using Atlas Copco balancer adapter kit and hook it up with the tool.
Adjust the balancer to carry the weight of the torque arm, the tool holder and the tool.
Adjust the wire stop of the balancer so that the torque arm cannot be fully retracted.
Secure all the screws with the set screws (see Spare Parts) and tighten them to 2.5 Nm.
Working area when mounted on a ceiling

Operation
Operating Instructions
Operating the torque arm
Make sure that the tool holder is correctly tightened before using the torque arm.
When using the torque arm the first time, start at a low tool torque to get used to how to operate the torque arm.
Service
Maintenance Instructions
Daily maintenace
Do not operate the torque arm if it is damaged or malfunctioning.
-
Examine the torque arm attachment and all structural parts for wear and cracks.
-
Examine the torque arm for loose screws and nuts.
-
Do a complete functional test including a full extension and retraction of the torque arm in its complete range of movements.
-
Examine sliding bearings and axles when there is high friction.
-
Replace the entire arm if extensive wear, cracks and/or damage are detected.
-
Replace worn nuts or washers.
Lubrication Instructions
Lubrication
The bushings on the arms does not need to be lubricated.
Recycling
Environmental Regulations
When a product has served its purpose it has to be recycled properly. Dismantle the product and recycle the components in accordance with local legislation.
Batteries shall be taken care of by your national battery recovery organization.
Recycling information
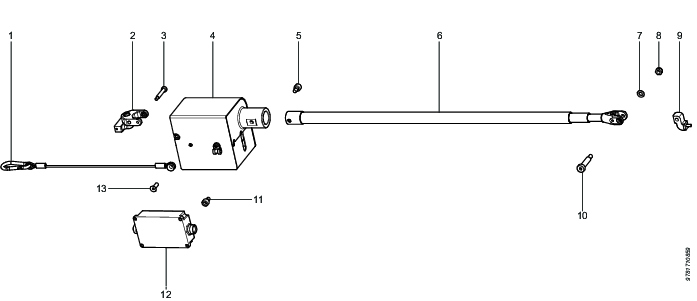
Pos. | Part | Remarks | Recycle as |
|---|---|---|---|
1 | Safety wire |
| Metal, steel |
2 | Attachment | Metal, aluminum | |
3 | Screw | Metal, steel | |
4 | Positioning box | Electronics | |
5 | Screw | Metal, steel | |
6 | Arm | Carbon fiber | |
7 | Washer | Metal, steel | |
8 | Nut | Metal, steel | |
9 | Tool holder attachment | Metal, aluminum | |
10 | Screw | Metal, steel | |
11 | Screw | Metal, steel | |
12 | Power unit | Electronics | |
13 | Screw | Metal, steel |