Scanner and Tag for ETP TBP Tools
Instruction Supplement
General Information
The following scanners and tags are applicable:
Scanner | 4220504499 |
ILT Tag ETP TBP | 8436677010 |
ILM Tag ETP TBP | 8436677610 |
ILT Tag TBP 3in1 | 8436677011 |
2D Scanner TBP | 8433061556 |
Selector TBP | 8433061620 |
Scanner with display TBP | 8433061590 |
Intended Use
These instructions only apply to ETP TBP61, ETP TBP81 and ETP TBP91 tools.
Mounting a Scanner or Tag to the Tool
When working on the assembly, use blunt plastic tweezers to avoid damaging parts or cables.
For torques and bolt sizes, refer to the applicable tool model in ServAid.
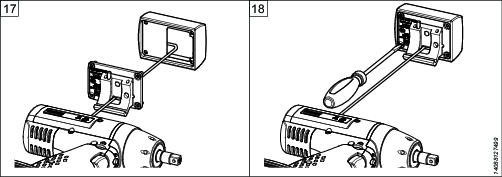
Steps 16 to 18 do not apply to ILM and ILT tool tags.
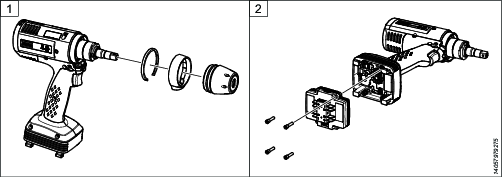
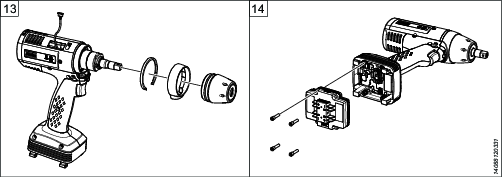
Remove the protective cover, the front part and the ring.
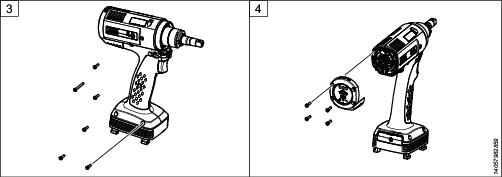
Remove the four screws of the power module. Remove the power module.
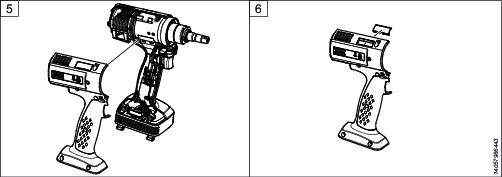
Remove the six screws of the handle side cover.
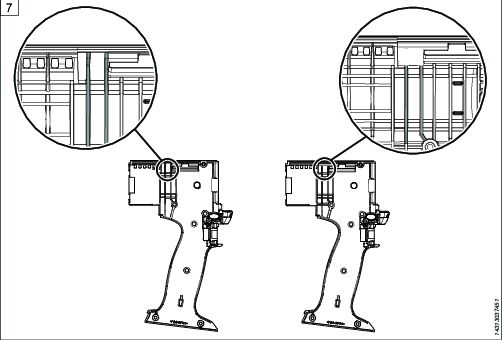
Remove the four screws of the back end cover. Remove the back end cover.
Remove the handle side cover.
Remove the lids on both sides of the tool.
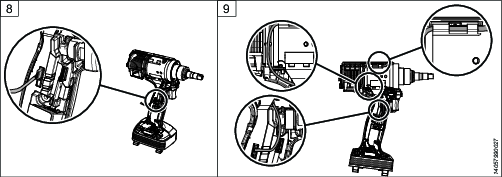
For generation B tools, remove the three ridges of the left side cover with an appropriate tool to make space for the accessory cable.
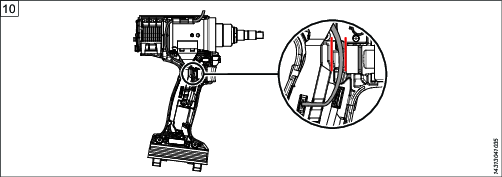
Connect the accessory cable to the AUX connection in the handle module. Unplug the accessory cable from the accessory circuit board if applicable.
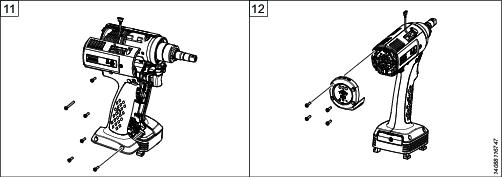
Pull the cable under the upper part of the ground plate top and along the motor housing. Make sure that the cable reaches out of the tool.
Make sure that the accessory cable is placed inside the red marks shown on the illustration.
Put the handle side cover back in place while pulling the accessory cable through the lid and tighten the six screws.
Put the back end cover back in place and tighten the four screws.
Reattach the ring and the front part and fasten the protective cover.
Put the power module back in place and tighten the four screws.
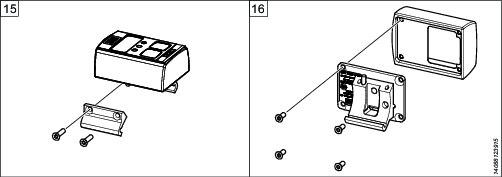
Remove the two mounting screws of the accessory attachment.
Remove the four screws of the accessory lid. Remove the lid.
Pull the accessory cable through the accessory lid and connect the cable to the accessory circuit board.
Put the accessory lid back in place and tighten the four screws.
Position the accessory in place and tighten the two mounting screws of the accessory attachment.
