Sliding Reaction Arm
Hydraulic Torque Wrench
Product Information
General Information

Safety Signal Words
The safety signal words Danger, Warning, Caution, and Notice have the following meanings:
DANGER | DANGER indicates a hazardous situation which, if not avoided, will result in death or serious injury. |
WARNING | WARNING indicates a hazardous situation which, if not avoided, could result in death or serious injury. |
CAUTION | CAUTION, used with the safety alert symbol, indicates a hazardous situation which, if not avoided, could result in minor or moderate injury. |
NOTICE | NOTICE is used to address practices not related to personal injury. |
Website
Information concerning our Products, Accessories, Spare Parts and Published Matters can be found on the Atlas Copco website.
Please visit: www.atlascopco.com.
ServAid
ServAid is a portal that is continuously updated and contains Technical Information, such as:
Regulatory and Safety Information
Technical Data
Installation, Operation and Service Instructions
Spare Parts Lists
Accessories
Dimensional Drawings
Please visit: https://servaid.atlascopco.com.
For further Technical Information, please contact your local Atlas Copco representative.
Country of Origin
For the Country of Origin, please refer to the information on the product label.
Dimensional Drawings
Dimensional Drawings can be found either in the Dimensional Drawings Archive, or on ServAid.
Please visit: https://webbox.atlascopco.com/webbox/dimdrw or https://servaid.atlascopco.com.
Overview
Technical Product Data
Technical Product Data can be found on either ServAid, or the Atlas Copco website.
Please visit: https://servaid.atlascopco.com or www.atlascopco.com.
Installation
Installation Instructions
Removing the Standard Reaction Arm
Loosen and remove the three anchor retaining screws.
Press the release button and slide the reaction arm sub-assembly off the wrench.

Installing the Sliding Reaction Arm
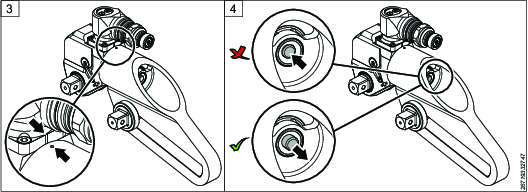
Align the sliding arm dot with the dot on the wrench.
Keep the sliding arm in parallel with the wrench.
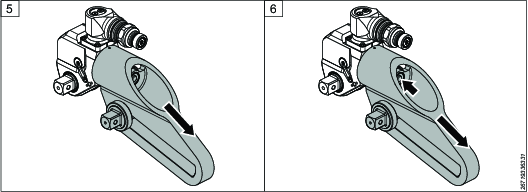
Push the sliding arm over the wrench splines. The sliding arm clicks when it is fully engaged.
Make sure the button in the slot pops out.
Pull the sliding arm to make sure that it is fastened correctly.
To release the sliding arm, push the button in the slot and pull it away from the tool.

Operation
Ergonomic Guidelines
Consider this list of general ergonomic guidelines to identify areas for improvement in posture, handling or work environment.
Take frequent breaks and change work positions frequently.
Adapt the workstation area to your needs and the work task.
Adjust for a convenient reach range by determining where tools need to be located to avoid static load.
Avoid work positions above shoulder level or with static holding during assembly operations.
When working above shoulder level, reduce the load on the static muscles by lowering the weight of the tool, using for example torque arms, hose reels or weight balancers. You can also reduce the load on the static muscles by holding the tool close to the body.
Take frequent breaks.
Avoid extreme arm or wrist postures, particularly during operations requiring a degree of force.
Adjust for a convenient field of vision that requires minimal eye and head movements.
Use appropriate lighting for the work task.
Select the appropriate tool for the work task.
In noisy environments, use ear protection equipment.
Operating Instructions
Operation Safety

Operating the tool with Sliding Reaction Arm
For detailed operating instructions refer to the Torcflex Product information under Operation, Operating instructions.
The Sliding Reaction Arm work with two identical sockets, the reaction nut should be on the same level as the driving nut. Make sure that the reaction arm is flat and the slider assembly tightened before use.

Setting the position of the Sliding reaction arm
Select two identical impact sockets and attach them to the wrench and the sliding reaction arm with a socket pin and ring.
Loosen the slider assembly. Position the slider to the correct pitch.
When the sockets are in position, tighten the slider by hand.


Checking the drive direction
Before use of the wrench, make sure that the rotational direction is correct. The arrow on top of the tool indicates the direction.

The reaction arm rotates in the opposite direction to the drive until it contacts a suitable reaction point.
To reverse the rotational direction, the drive and slider must be removed and installed on the opposite side of the wrench. For detailed instruction refer to the Torcflex operating instructions.
 | |
Tightening position | Loosening position |
Changing the rotational direction
Loosen the slider cap.
Remove the slider from the slot in the reaction arm.
Rotate the assembly to the opposite side of the slot.
Tighten the slider cap.


Service
Maintenance Instructions
Maintenance
Torcflex accessories are subject to high forces and should be inspected for damage after every use. Always replace a damaged part.
For detailed maintenance instructions refer to the Torcflex Product information under Service, Maintenance instructions.
Recycling
Environmental Regulations
When a product has served its purpose it has to be recycled properly. Dismantle the product and recycle the components in accordance with local legislation.
Batteries shall be taken care of by your national battery recovery organization.