Positioning Kit, AX1
Torque Arm
Introduction
In this section, you can find the basic information about the product and also the formatting conventions used in the topics.
Overview of Positioning Kit
Torque arms AX1-1.5-F and AX1-1.5-R are provided with two types of positioning kits:
Positioning-kit-3-Encoder
Positioning-kit-4-Encoder
Positioning-kit-B-Encoder
Positioning-kit-3-Encoder
Positioning kit for Fixed type of torque arm AX1-1.5-F, 4390160101.

Positioning-kit-4-Encoder
Positioning kit for Rotating type of torque arm AX1-1.5-R, 4390160201.

Positioning-kit-Brake-Encoder
Positioning kit for Rotating type of torque arm with brake mounted AX1-1.5-R-B, 4390160301.

Installation and Upgrade
In this section, you can find information to help with the initial installation of the product, or upgrading from one version to another.
Mounting instructions for positioning kit
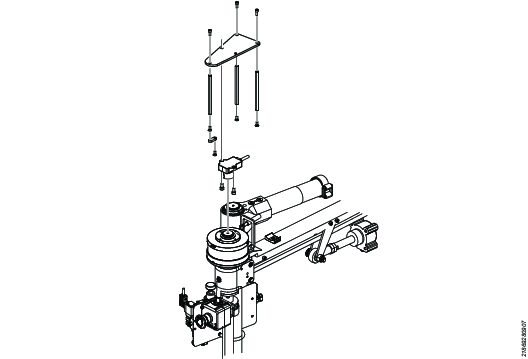
Positioning kit details:
1 | Hex Socket Screw |
2 | Encoder Mounting Plate |
3 | Inductive Angle Sensor |
4 | Hex Socket Screw |
5 | Mounting Spacer - Top |
6 | Encoder Pin |

Positioning element must be fully seated against the mounting pin to ensure proper sensing gap with the encoder
In "home" position, the mark on the encoder should align with the mark on the positioning element.


Attach encoder cables and utilize a stain relief to keep the tool cables easily fixed and easily accessible.
Ensure that the cable fixing points are located on the backside of the parallel arm, boom arm, and pillar.
Use straps to anchor the cables to the arm.
Attach I/O module to the controller mounting plate.

Connect the encoders to the I/O module as shown in the coupling overview. Detailed view of the encoder hardware QR14, Analog 4-Encoder.

Recycling
In this section, you can find information about how to recycle the product.
Environmental Regulations
When a product has served its purpose it has to be recycled properly. Dismantle the product and recycle the components in accordance with local legislation.